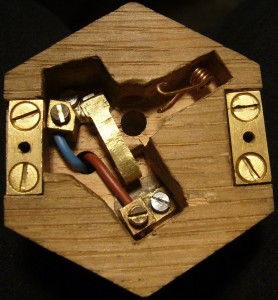
I’ve spent what seems like an inordinate amount of time getting the bellpush switch right. This photo shows my first attempt:
The long contact strip is made from a roughly T shaped strip of 0.7mm brass. It’s bent into a zig-zag at one end to make it more flexible (I also had to file it narrower for the same reason). One of the problems I ran into was I initially didn’t recess the contacts deep enough to ensure the terminal screws can’t press against the underside of the top. The top of the flexible strip is slightly curved so that when the lip of the button pushes down on it, it flexes a little and ‘wipes’ the contacts against each other to (in theory) break through any oxide film that may have developed since the last time it was used. The contacts are made of short sections of flattened 4mm diameter sterling silver rod (for good corrosion resistance), silver-soldered onto the brass parts. The screw terminals are salvaged from a UK 13A mains plug, filed a bit narrower due to the limited space available. I did all the soldering with the Eclipse spirit blowpipe described in an earlier article. They are held down by M2.5 stainless steel machine screws, mated to square S.S. nuts morticed into the back of the box.
When I got to this stage I thought the switch was done. The button action felt nice and the contacts closed when I pressed it. Unfortunately there was a problem, as I discovered when I proudly showed it off to my friend Juliet. She pressed it normally a couple of times and it worked fine, then she tried pressing it really gently. It didn’t work. She tried the same thing a few more times with intermittent results and proclaimed it faulty.
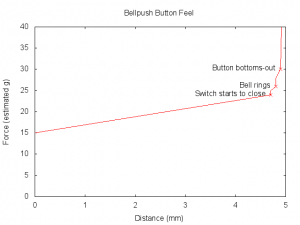
It was a user interface problem: press the button down firmly all the way to the bottom and it worked fine. Press it very gently and it was possible to feel the slight increase in resistance as the contacts began to close and stop pressing too soon. Result: the bell doesn’t sound, and you might not realise if you were outside and the bell was inside. I suppose some people seeing such an ornate bellpush might think that it looks delicate and press the button gently in fear of damaging it (in fact you’ve probably got more chance of breaking your finger than the button). This graph illustrates the problem (figures are estimates):
The problem is that first step when the button lip touched the flexible contact strip and the switch began to close. If you were pressing gently enough, it (wrongly) felt like that was the bottom of the button travel when you actually needed to press a tiny bit harder to close the contacts.
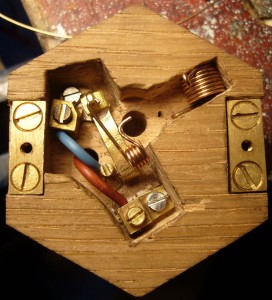
I won’t go through the list of ways I tried to solve this problem. I now have quite a collection of discarded springs! What I eventually settled on was a second helical torsion spring attached to the top of the flexible contact that applies gradually increasing pressure to it over the full length of the button travel. The result is that the switch closes smoothly without any detectable step increase in force, and the contacts are fully closed at about 80% of full travel. If you press the button firmly enough, it bottoms out against the top of the contact strip and wipes the contacts as originally intended.
I also had to remake the first spring with more and bigger coils to weaken it (I could also have used thinner wire but I didn’t have any in stock), because the combination of the two springs made the button force uncomfortably high. I didn’t want to remove the first spring and just use the second one to return the button because it’s set such that the pressure on it is zero at the top of the button travel so as to ensure the contacts release properly, which means the button wouldn’t return to the top as cleanly with that spring alone.
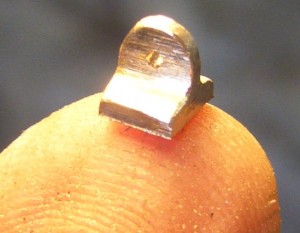
Here’s a cute picture of the little bracket I made to attach the new spring. I filed it from one of the brass 13A plug pins that I got the screw terminals from and silver-soldered it onto the contact end of the flexible strip (that’s a 0.8mm diameter hole):
This photo shows the final setup. The brass peg to the left of the flexible contact (a screw with the head filed down) is there to ensure the torsion spring can’t swing to the left and disengage from under the button:
Now that I had a working bellpush, I wanted to make a little video to show it off. I don’t have an electric bell here and the continuity buzzer in my multimeter doesn’t sound impressive enough, so I hooked it up to something else instead:


I was pressing it normally!!!!
I love the description of me “proclaiming it faulty” before presumably demanding another peeled grape be popped into my mouth as I recline on my velvet chaise longue.