Concertina pads are small discs that cover holes in the action board; when you press a button, it causes a pad to lift off its hole, which allows air to pass through a reed and produce a note. They are made from a sandwich of leather, felt and card. The leather forms an airtight seal against the hole, the card provides a rigid backbone and a surface for the action lever to attach to, and the felt acts as a buffer between the two that stops the pad making an audible slapping sound when it closes quickly.
It took quite a few experiments to find a combination of materials, glue, and procedure that produces satisfactory pads. Along the way I made quite a few pads that fell apart, were too hard or too spongy, and/or were too thick or too thin.
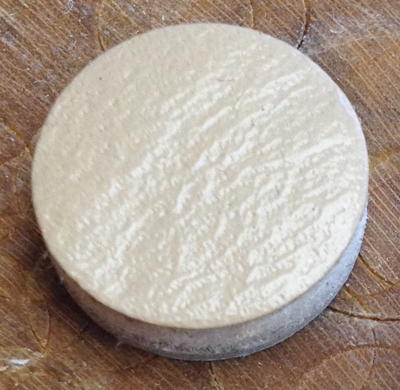
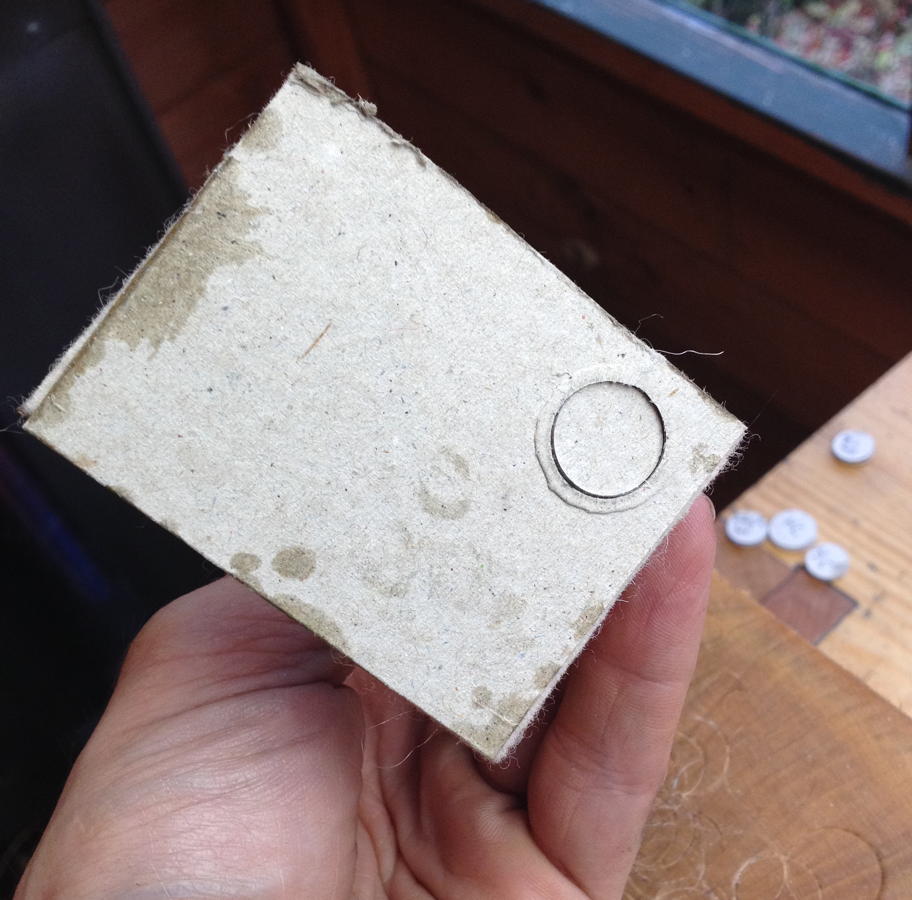
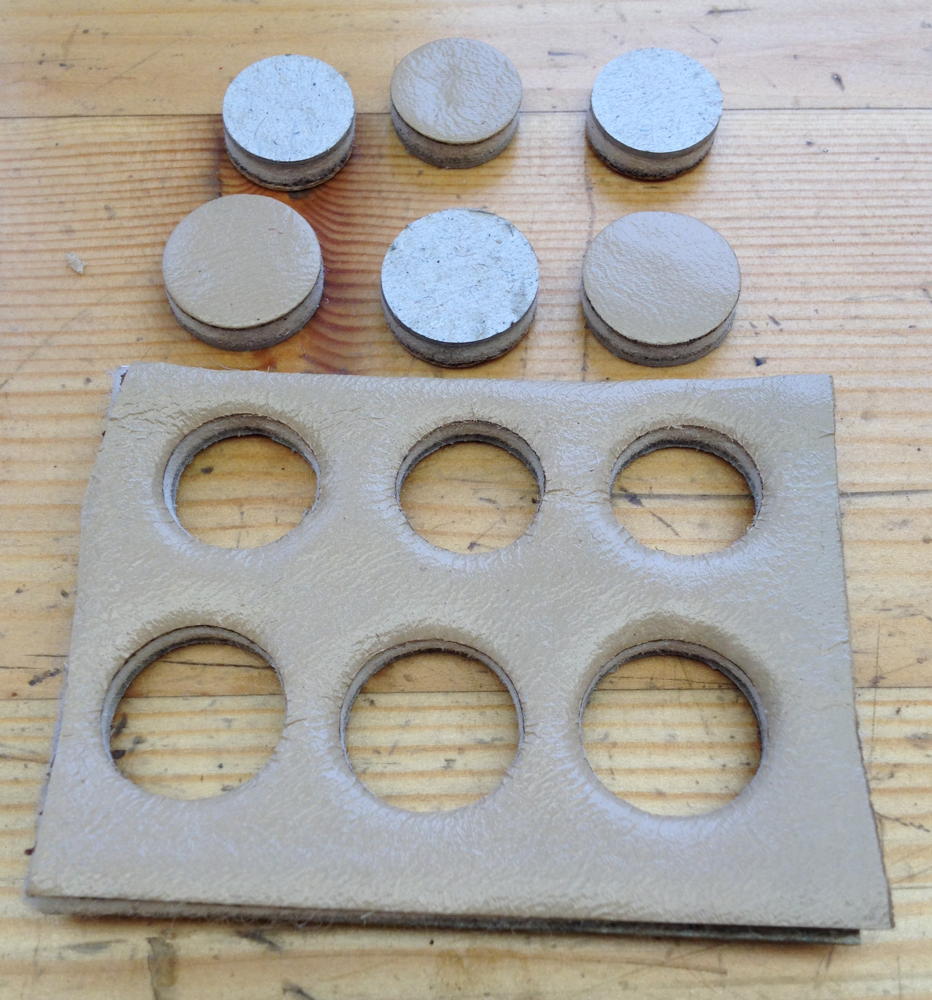
A pad ‘sandwich’ after gluing:
I eventually settled on hide glue with some urea added to extend the open time a bit. I soaked apart an antique Lachenal pad and I’m 99% sure it was glued with hide glue. PVA would probably work too, but when I tried it, it stuck well but it seemed to soak into the felt and make it harder. I know others have used sprayable contact adhesive successfully, but it barely stuck at all for me. There’s a bit of a knack to applying just the right amount of glue, and it’s important to brush it onto the card/leather, not the felt, otherwise it will soak up far too much glue and go hard when it eventually dries. Clamp the sandwich as lightly as possible and take it out of the clamp after an hour to avoid permanently compressing the felt. Leave it at least a few hours to dry before punching the pads out.
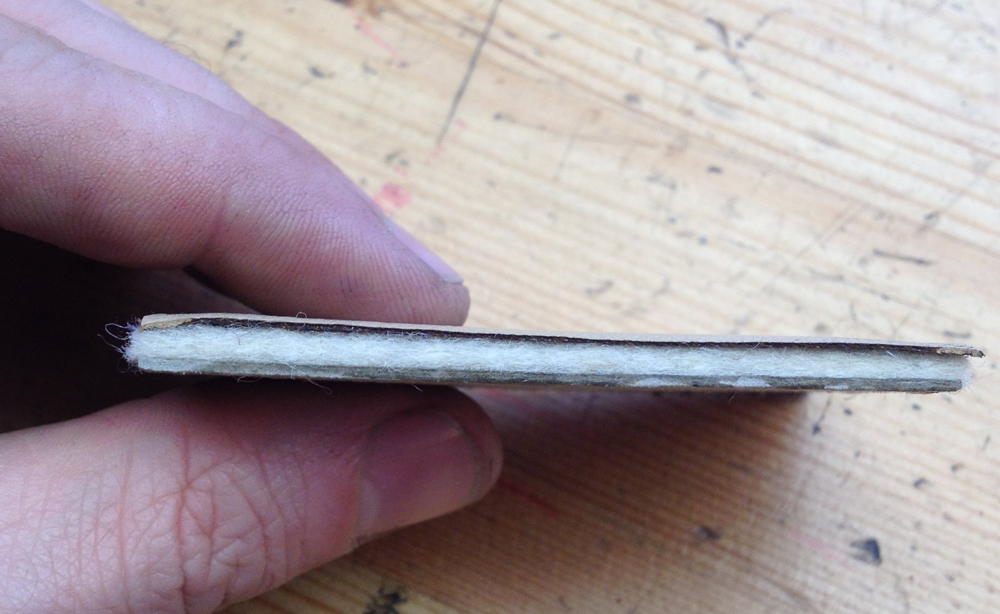
The leather is thin smooth sheepskin skiver, with the hair side out. The card is 1mm greyboard (I also tried millboard, but it turned out to be made of two layers that delaminated when I punched the pads out). I tried five different wool felts before settling on this one, which the supplier describes as 1.5mm 25 S.G., though it starts out significantly thicker than that and compresses down a bit when you glue it.
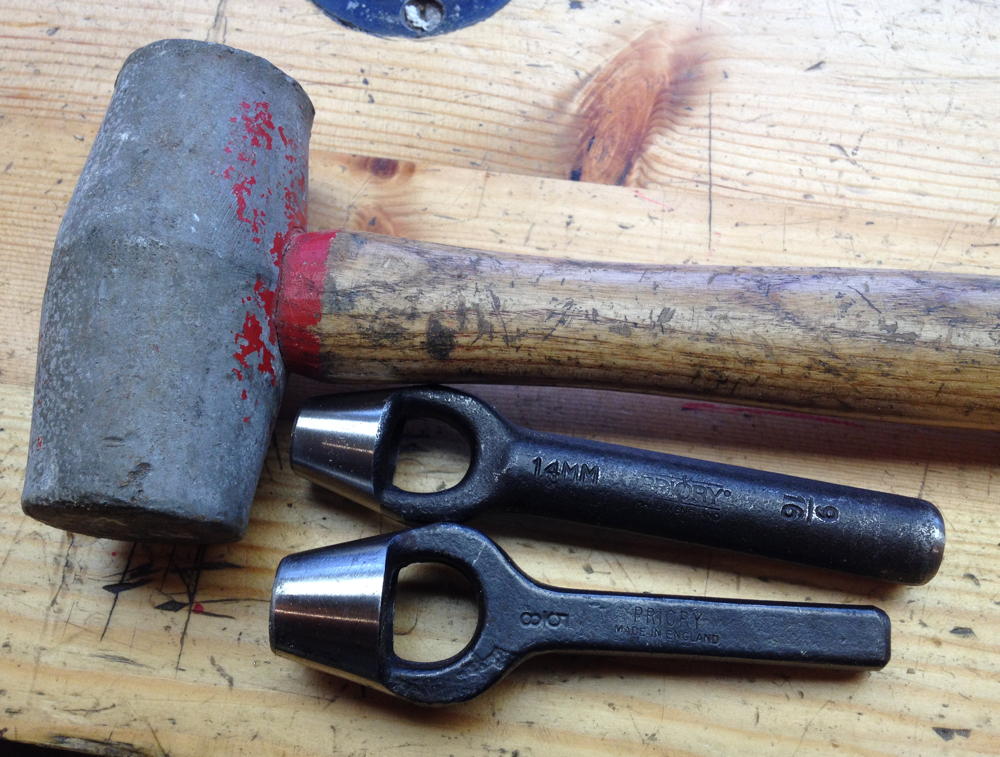
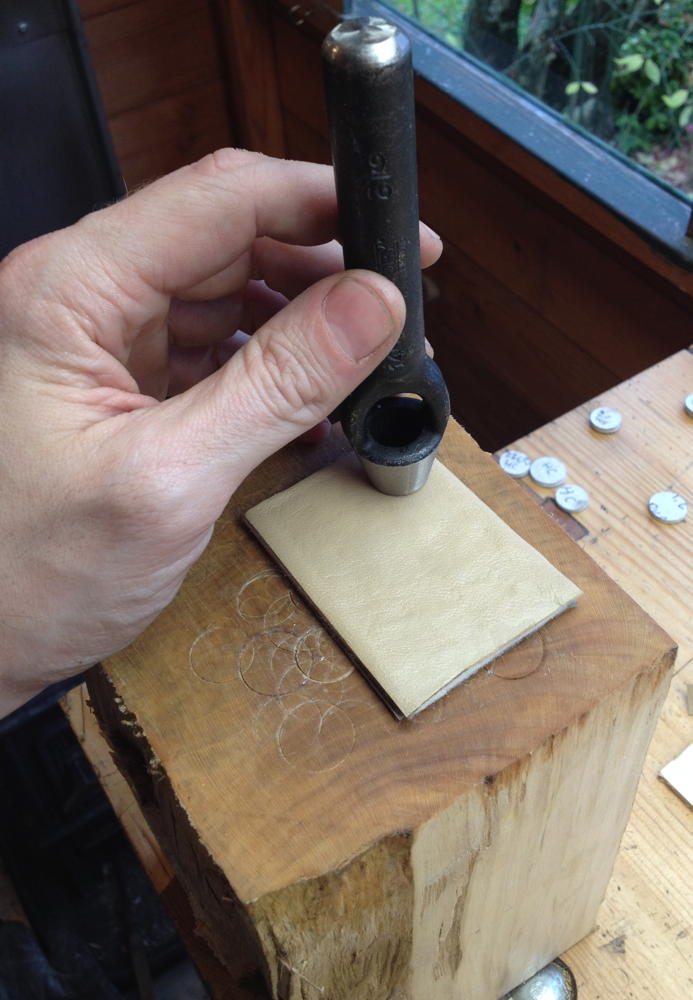
I’m punching the pads out using Priory wad punches (carefully resharpened), a lead mallet, and an anvil made from the smoothed end grain of a beech log soaked in boiled linseed oil.
It works best to punch with the leather side up, otherwise the card distorts and doesn’t cut cleanly.
It’s important to keep hammering until you’ve cut through the card all the way around.
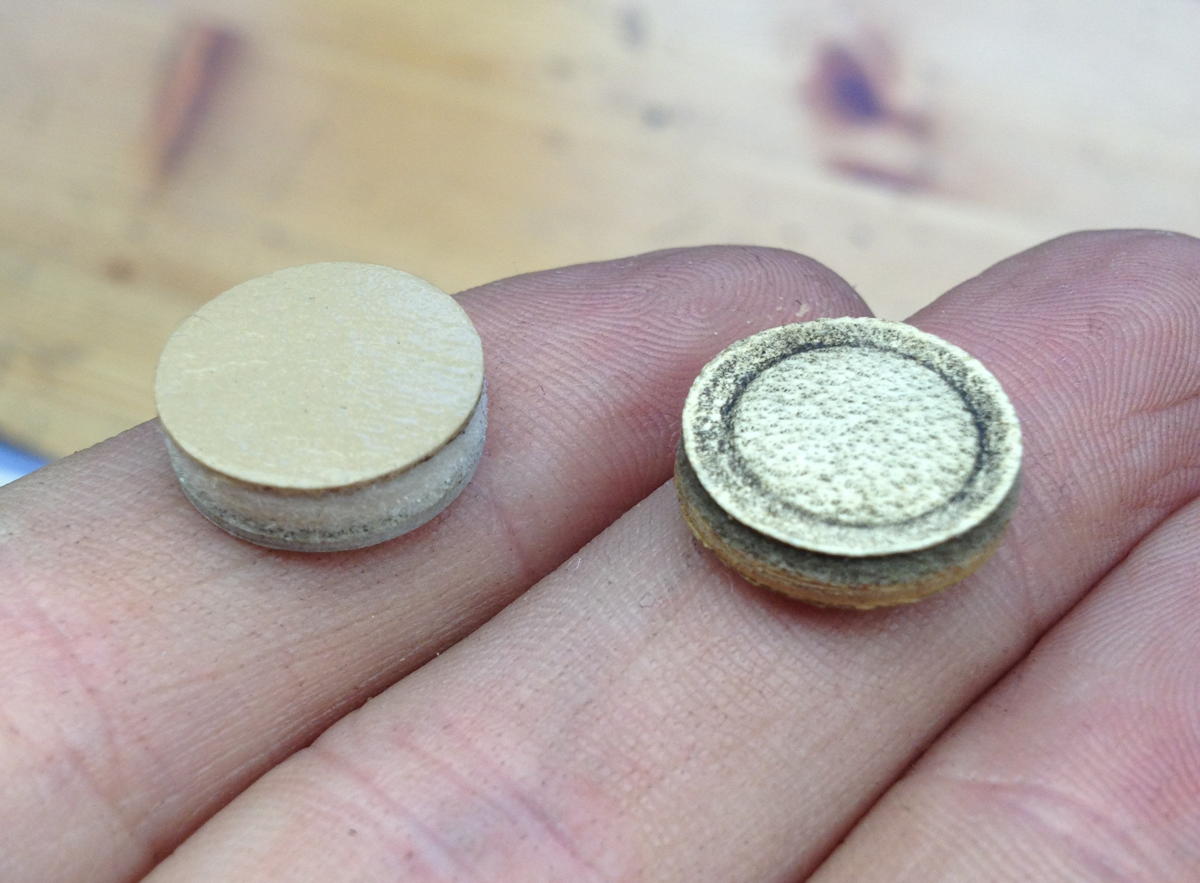
A new pad next to a ‘retired’ antique Lachenal one; the new one is a bit thicker and softer, but I think it will quickly compress down to about the same thickness.
I just finished fixing up a Bastari G/D Anglo for a friend who plays for Anonymous Morris. The aim was mainly to repair a few faults and tune it up, to make it more playable rather than carry out a complete restoration.
The first problem was that the action boxes had split apart in several of the corners, so I cleaned up the joints and glued them back together, adding reinforcing blocks to strengthen them. This was a bit of a delicate job because they were originally constructed with PVA glue and I couldn’t remove any significant amount of material from the joints when cleaning off the remains of the old glue or they would have got smaller and would no longer fit the rest of the instrument.
The chrome-plated brass end plates were a bit grubby so I gave them a quick polish:
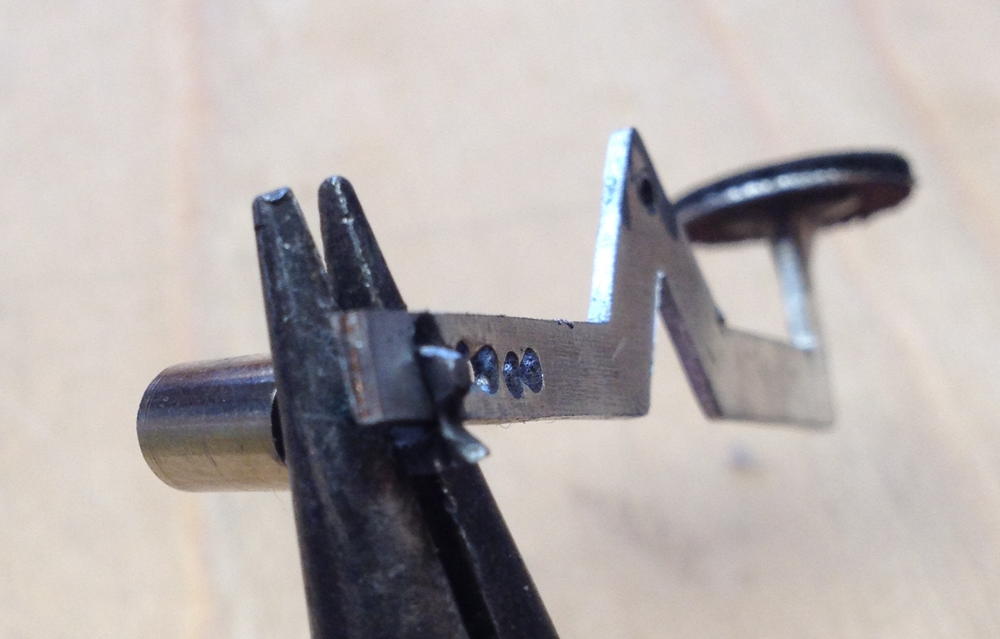
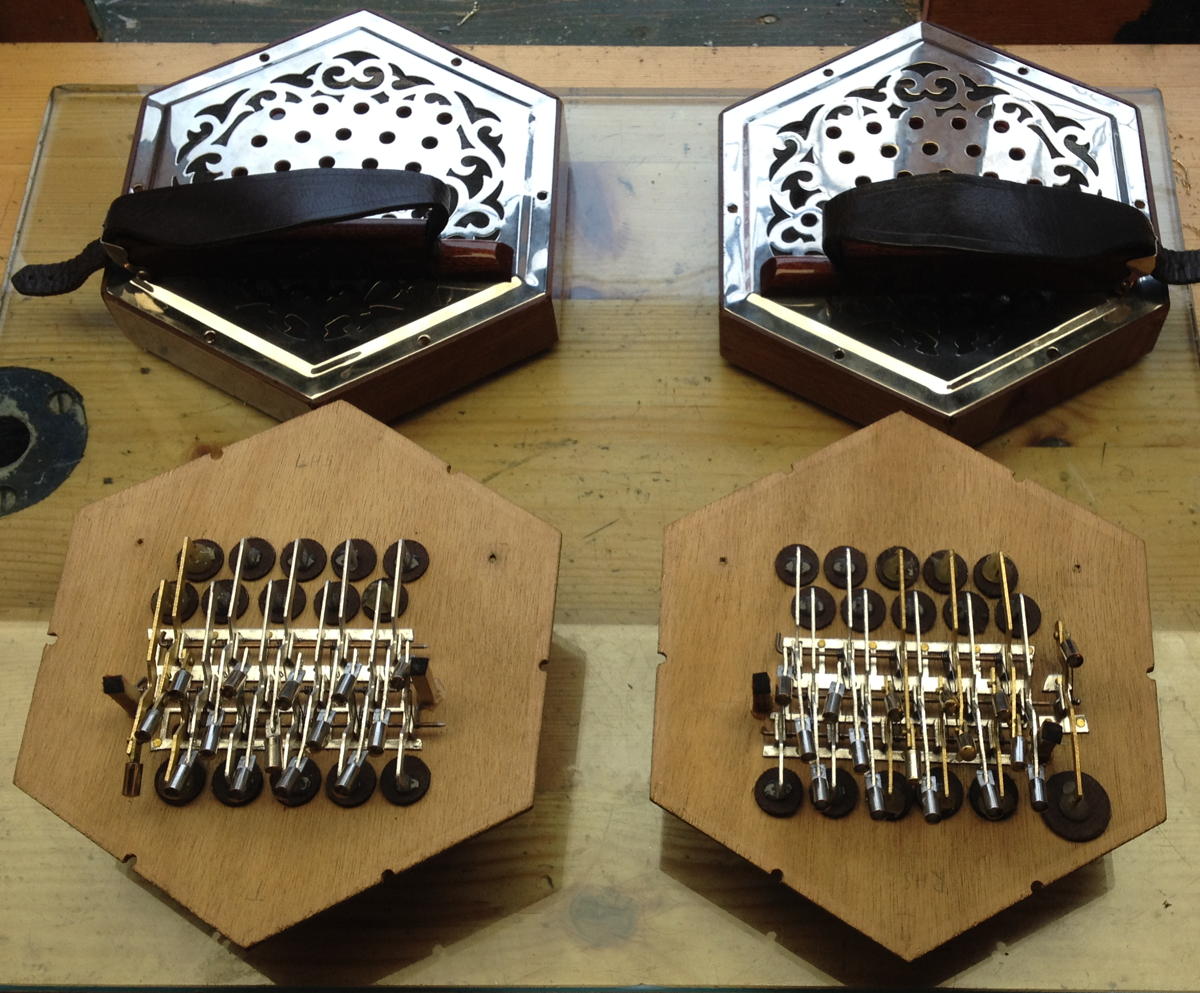
This instrument’s Achilles heel is the aluminium pivots where the buttons are attached to the action levers. Note that these are different from the rubber tube type commonly found on Stagi instruments. Most of them were rather wonky, and the most-used buttons were sloppy due to wear; a few were almost worn through:
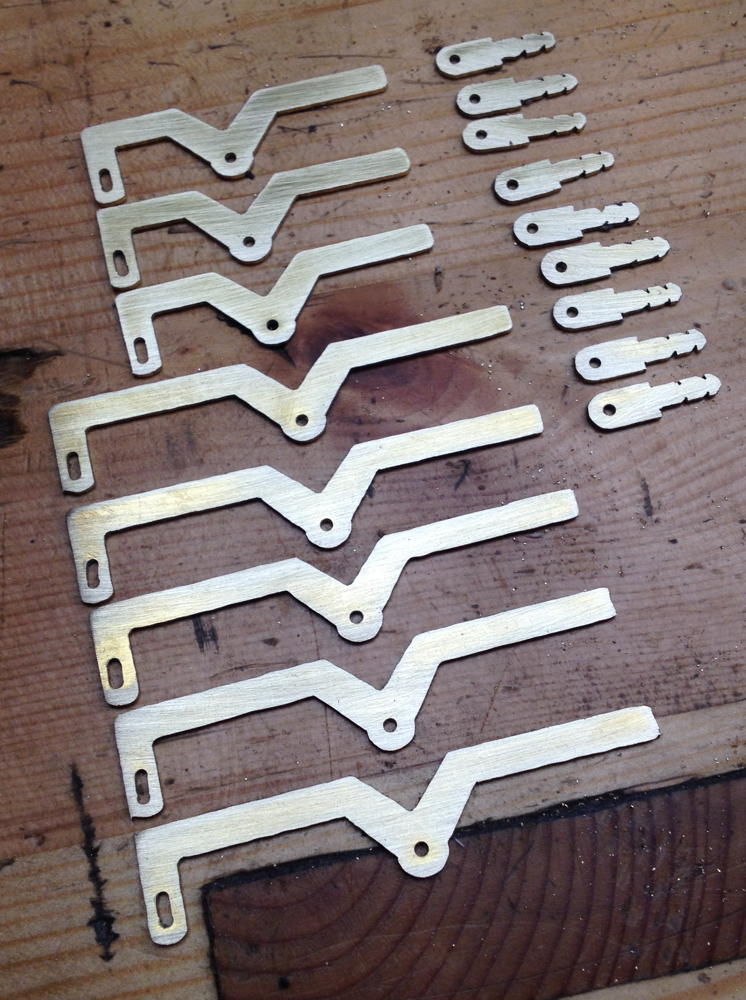
After discussing the problem with the client, I agreed to make replacements for the most-worn levers. I cut the new levers from 1mm brass sheet with riveted pivot points, so they are unlikely to wear out again. After designing the two sizes of lever and the button insert in CAD, I printed a template on sticky paper and cut them out by hand with a jeweller’s saw.
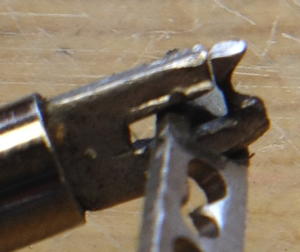
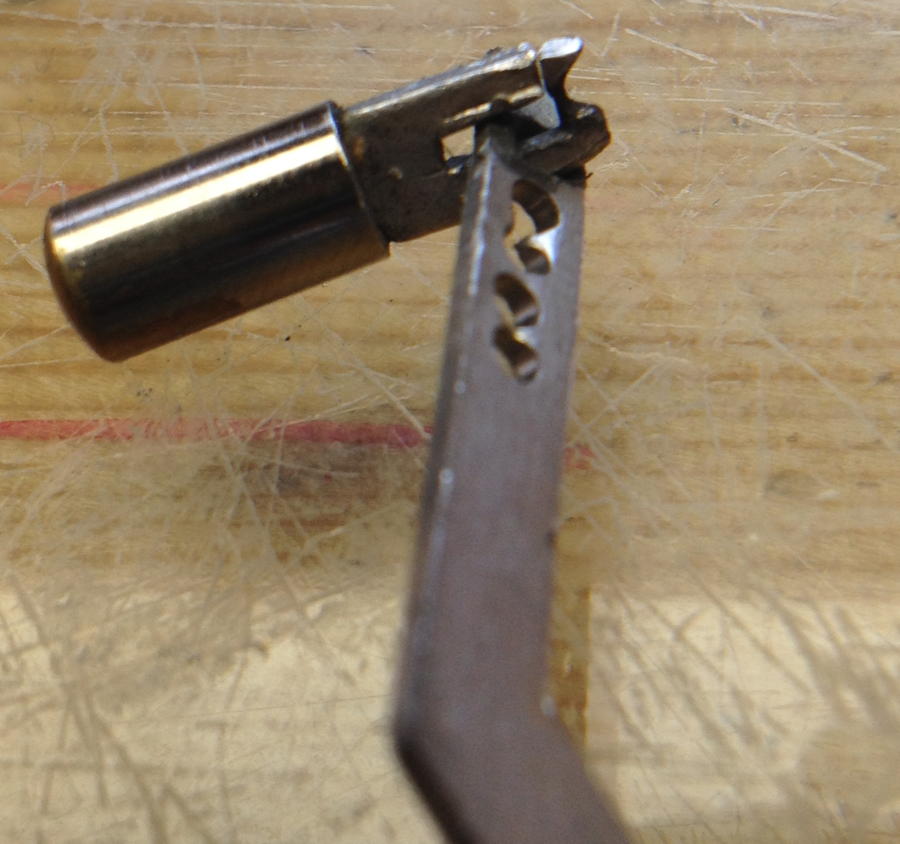
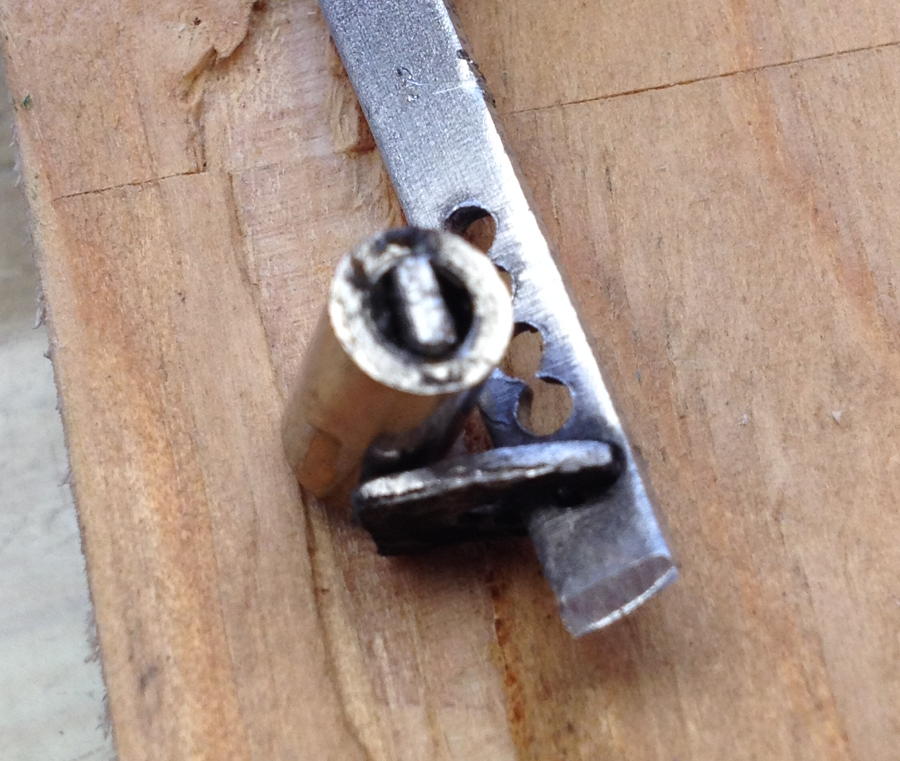
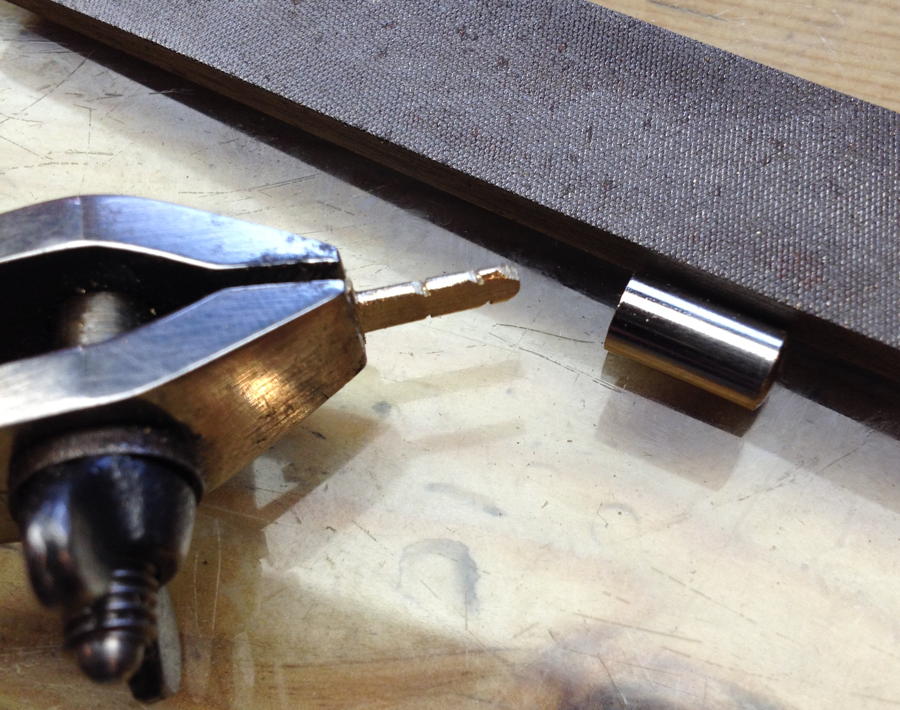
I re-used the top parts of the buttons, which were made from chrome-plated brass with the aluminium pivot glued into a hole in the bottom. The first step was to break off most of the pivot with a pair of needle nose pliers:
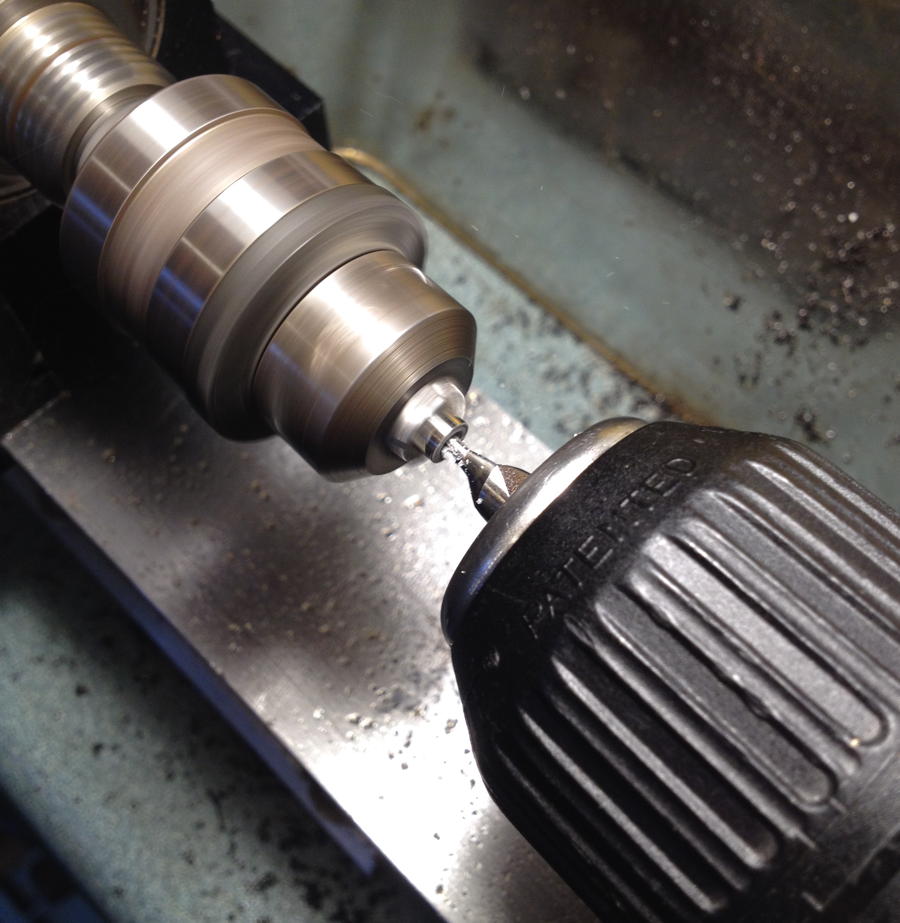
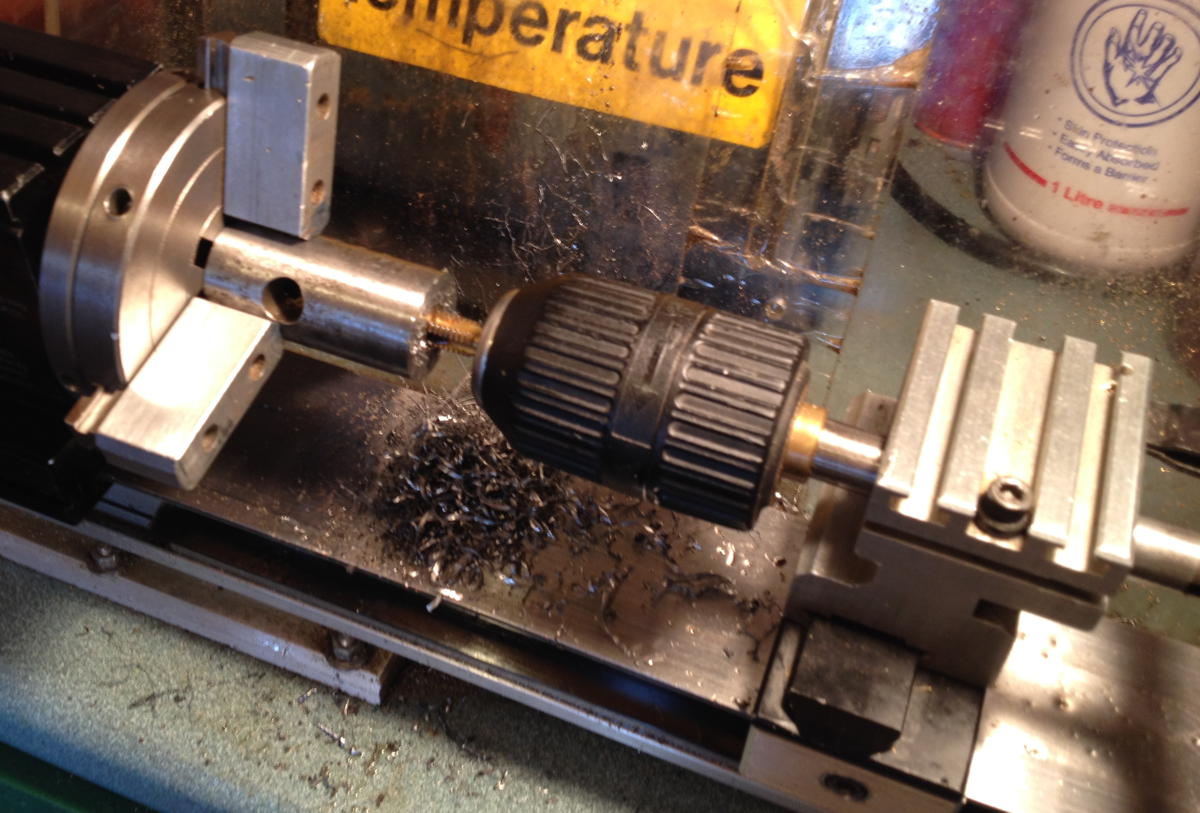
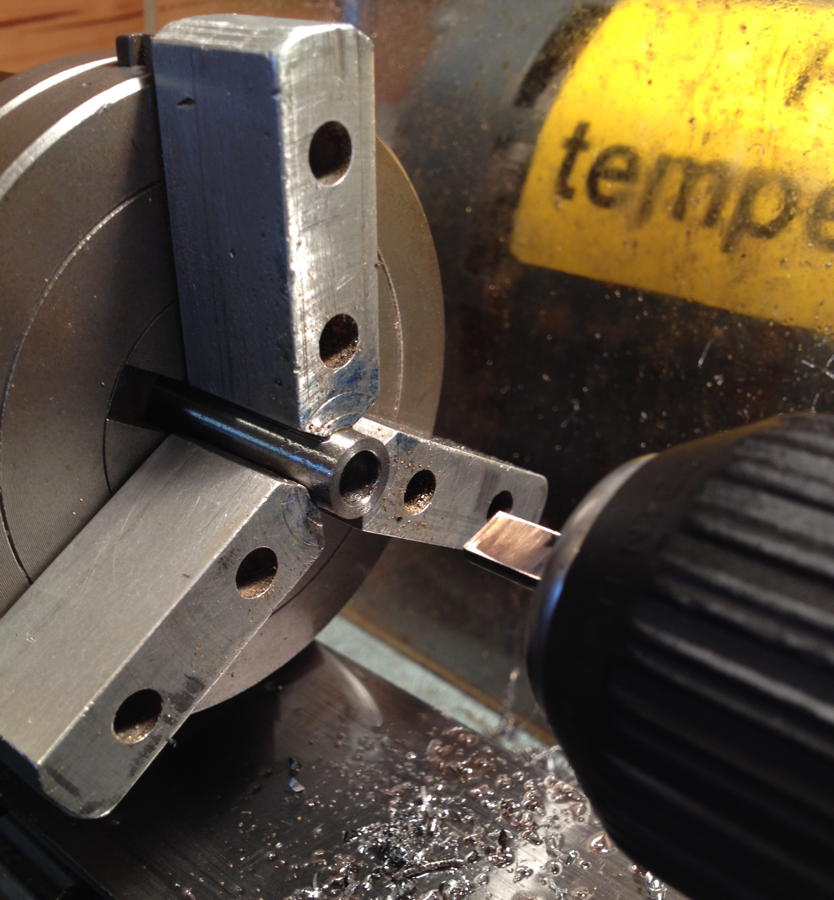
Then I put the button in a drill chuck in the lathe and drilled into it with a centre drill:
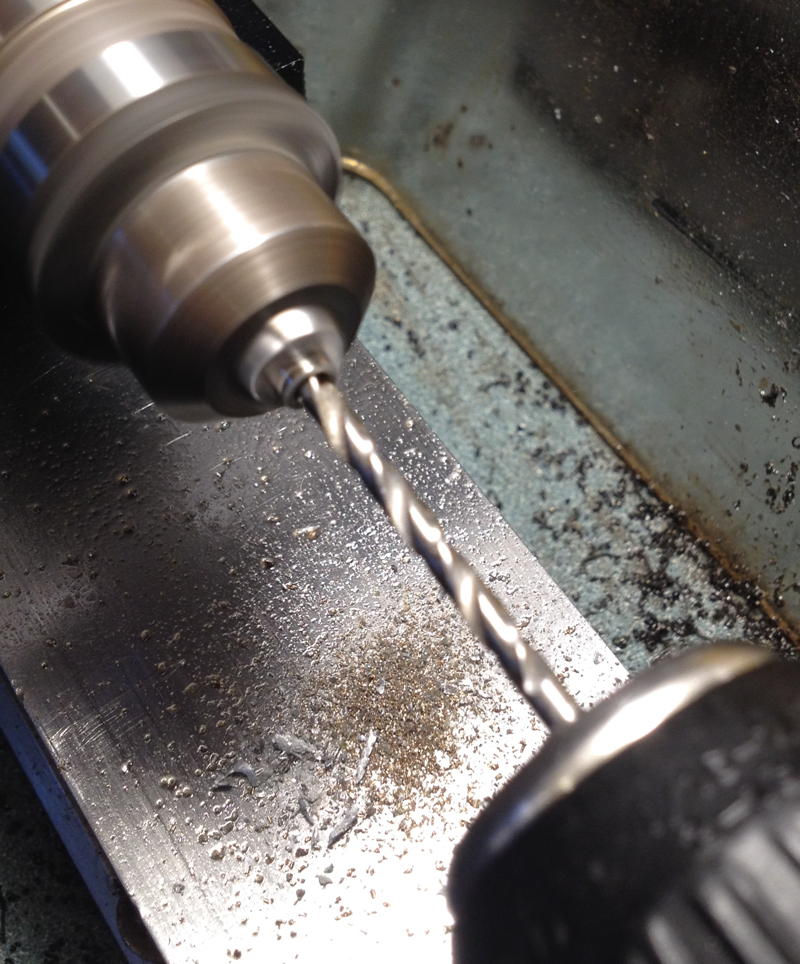
Then a 3mm drill (this was a tiny bit bigger than the original hole, so it left a nice clean surface on the inside of the hole):
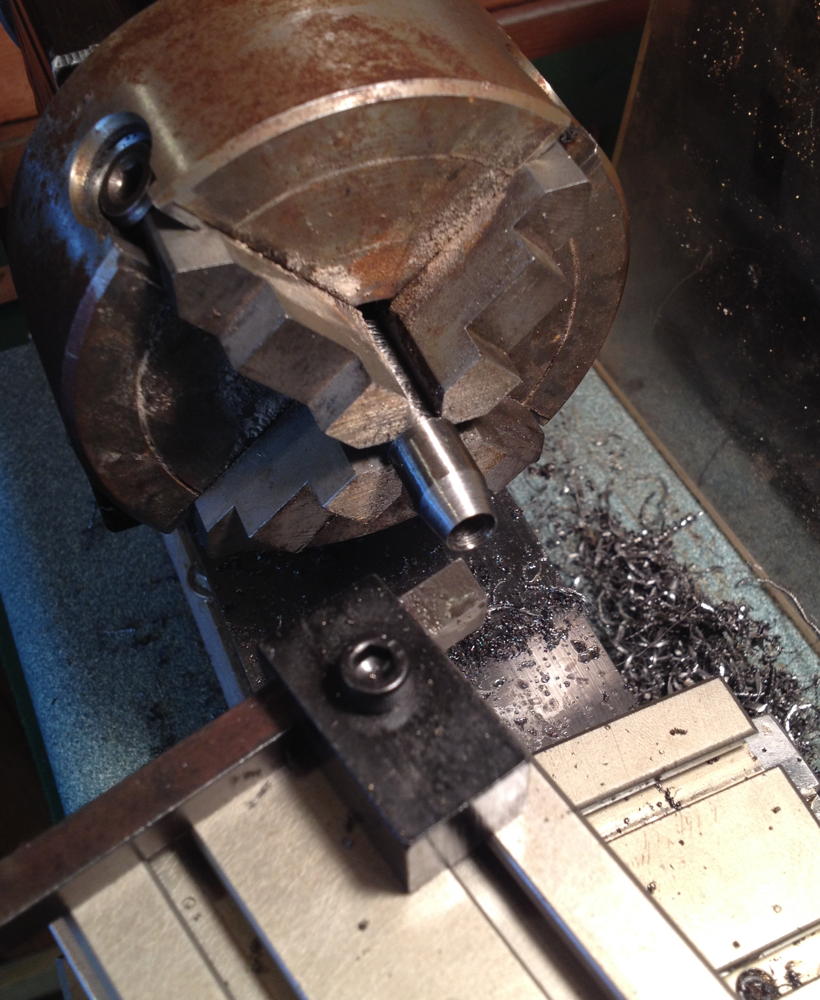
At a certain point, the drill stopped cutting; this meant that the tip of the old pivot had come loose and was stuck on the end of the drill bit. After withdrawing the drill and removing the loose piece I was able to finish cleaning up the rest of the hole:
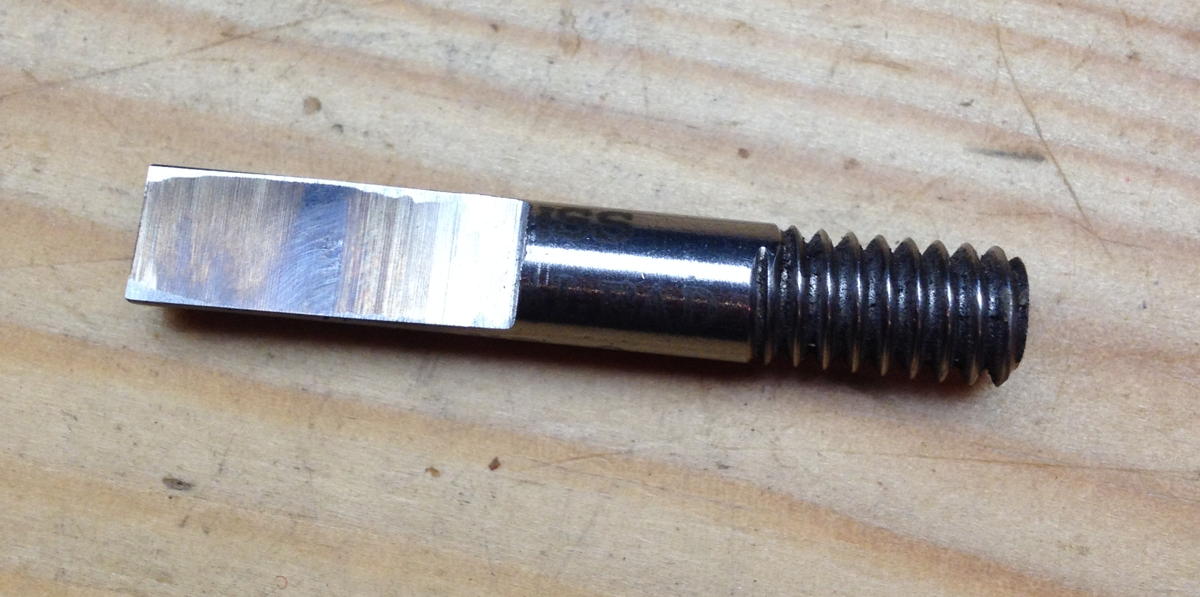
I sawed the new pivot pieces slightly wide, then carefully filed them down until they were a snug fit in the hole:
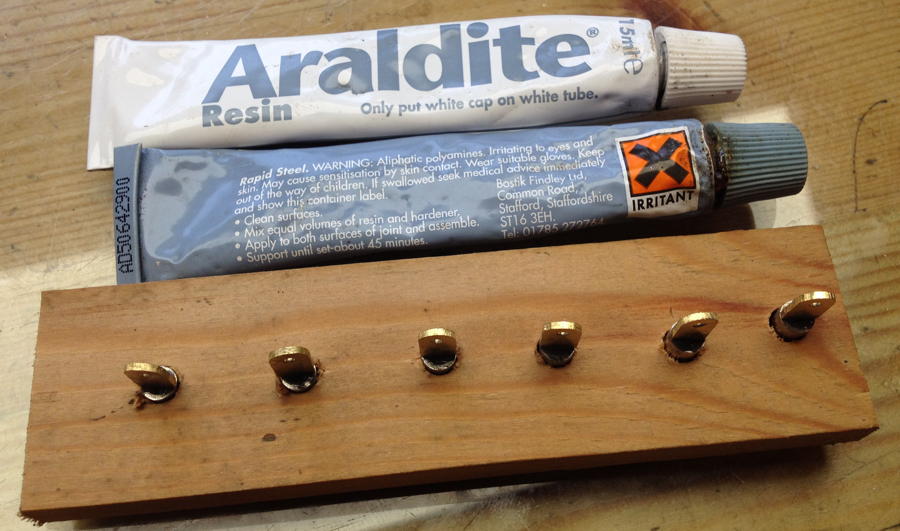
I glued the new pivot pieces in with Araldite Rapid Steel (an epoxy resin that is specifically formulated for gluing metal):
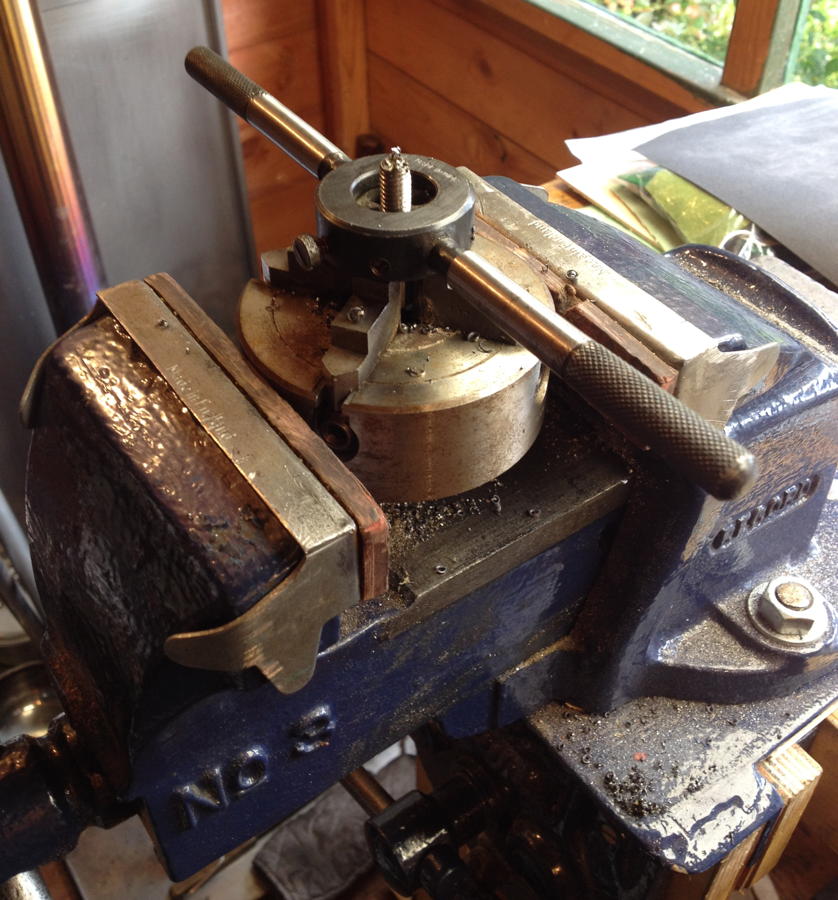
I found it easier to work on the action if I removed all the levers apart from the one I was working on at the time. I glued the new levers to the original pads using hot melt glue (this seemed to be how it was done originally), fitted the spring, put the end plate on, marked the position of the hole on the lever, took it apart, drilled the rivet hole in the lever, cut it shorter, riveted the button on, put it back together, and bent the lever until the button was directly below the hole.
Here’s a quick video clip of me riveting a button to a lever:
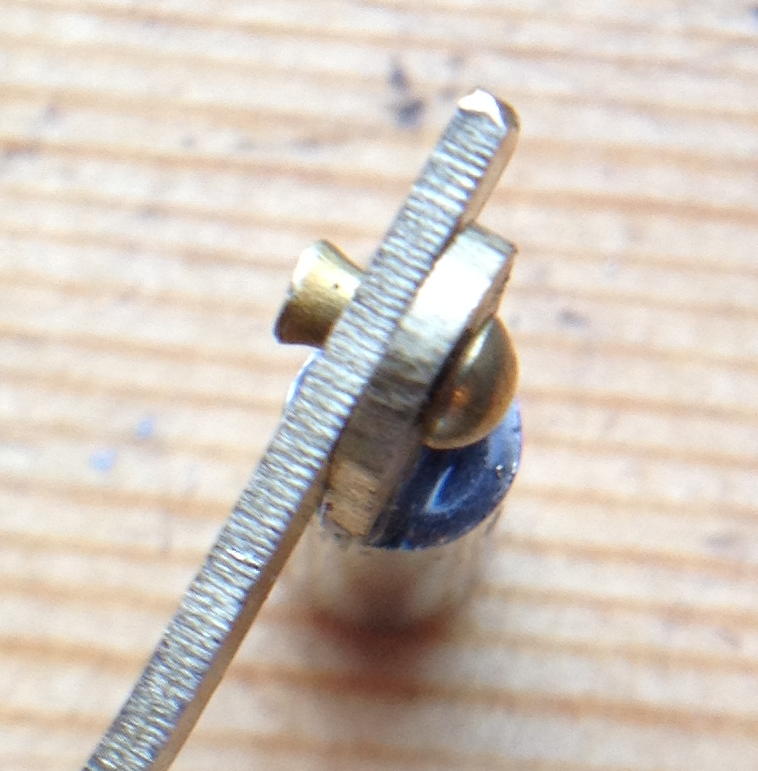
And here’s the resulting pivot. I actually made a ‘snap’ tool from hardened silver-steel to form domed rivet heads, however I found that it inevitably made the joint stiff if I hammered it enough to take out all the play. By using lots of light taps with a small ball peen hammer instead, I was able to make pivots that work and feel just right. Note that the mushroomed end of the rivet doesn’t turn; it expands enough so that it is a tight fit in the lever, but there is just enough play in the joint for the pivot to turn smoothly without any noticeable wobble.
This video shows the difference between a sloppy worn-out pivot and one of my improved brass riveted ones:
As well as replacing ten of the levers, I adjusted the remaining 21 as best I could, straightening and tightening them up as much as possible. Rather a fiddly, painstaking task, and it’s impossible to get them perfect without replacing them all.
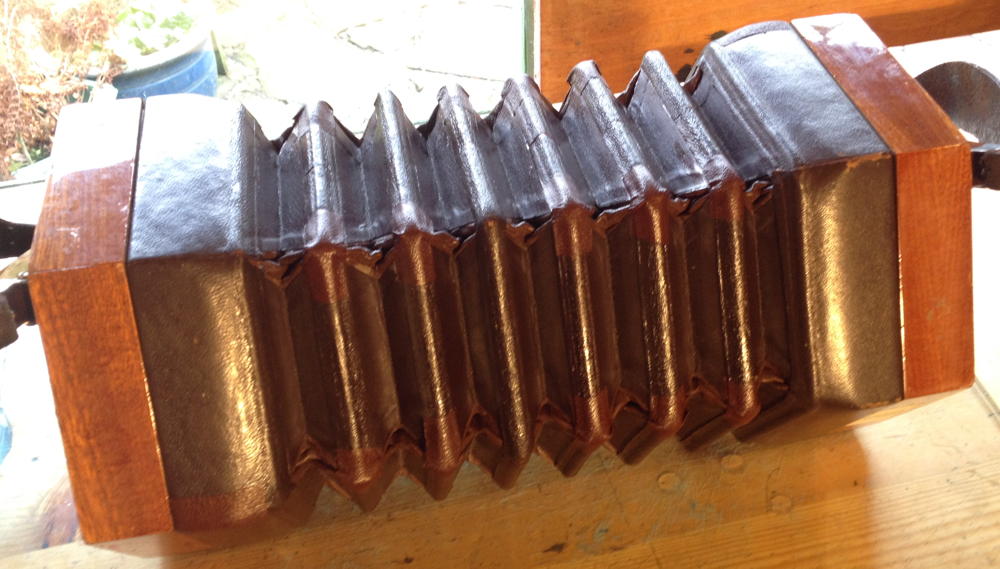
The bellows had quite a few worn corners, some of which were leaking air, so I glued thin patches on them. I tried to dye the new leather to match the old, but it didn’t work very well: I managed to get the leather slightly darker, but it seemed to quickly reach a point where it didn’t want to absorb any more of the dye.
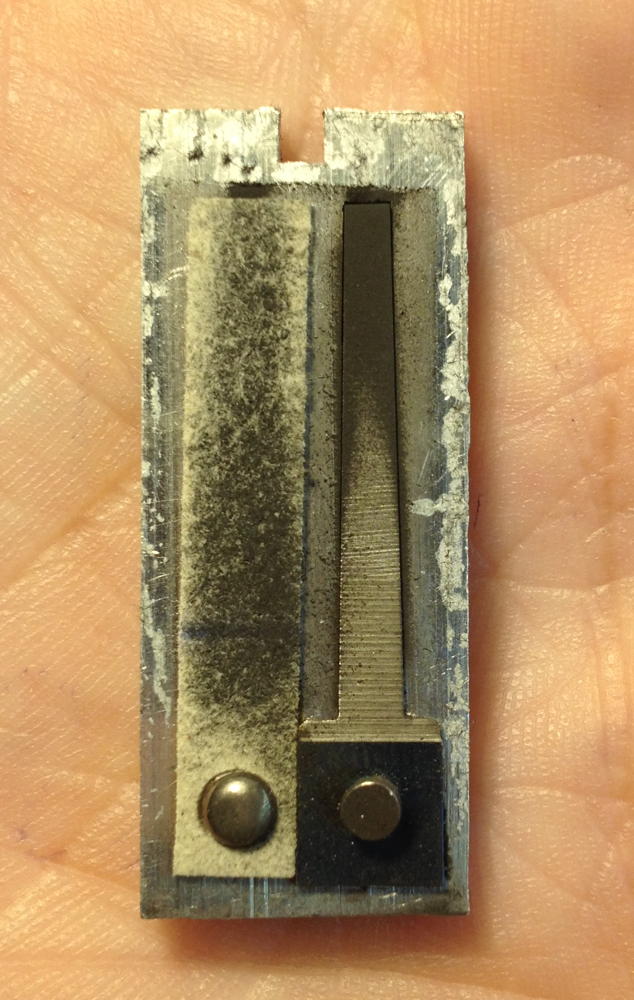
Tuning the instrument proved much more difficult and time-consuming than I expected. Some of the reeds were no trouble, but many of them behaved illogically, randomly going flat and muffled, then suddenly going sharper again when I fiddled with them or just after playing them for a while. In hindsight, stiff/sticky valves were mostly to blame for this. Some of the reeds were rather dirty; this one went five cents sharper when I wiped the sticky black dust off it:
There was one reed that nearly had me pulling my hair out: it kept going flat by six cents whenever I tightened the instrument’s end bolts down. After trying many different things, I eventually worked out that there wasn’t quite enough clearance between the reed tongue and frame on one side. Somehow, tightening the end bolts down was bending the sound board and applying a force to the reed frame that distorted it just enough to cause the tongue to slightly graze the vent side, which made it sound flat and slightly buzzy.
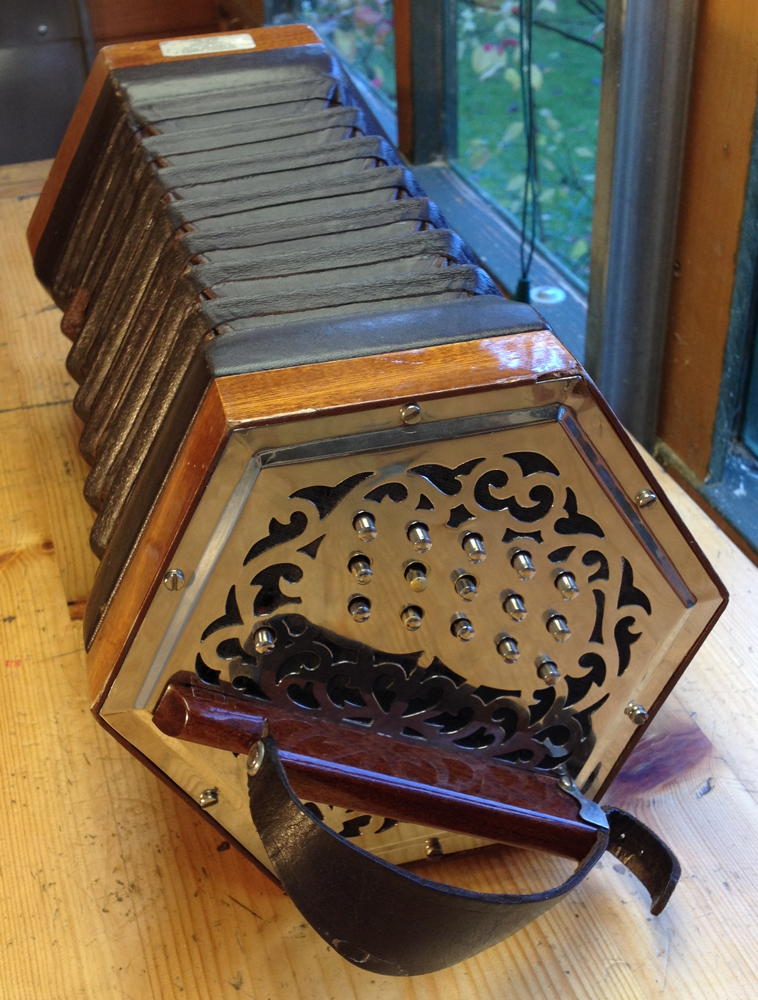
The finished instrument ready to go back to work, playing traditional English dance music:
Recently I was asked to try to come up with a concertina reed that works in both directions, or at least to figure out why it hasn’t been done before. Ordinarily, a free reed only speaks when you suck air down past the tongue, into and through the vent in the frame. Most concertinas have a pair of reeds controlled by each button; one inside the reed chamber that only sounds on the pull stroke and another mounted on the underside of the reed pan that only sounds on the push stroke. Anglo instruments take advantage of this to play different notes on pull and push (this is known as bisonoricity), whereas English and Duet instruments play the same note in both directions so they need a pair of identical reeds for every button. If it was possible to make a bidirectional reed that worked as well as two standard reeds, it could potentially enable unisonoric instruments to be made smaller, lighter, and cheaper.
The way I went about solving the problem was to first build what was pretty much a standard reed in an oversized frame and check that it sounded normally in the suck direction, then screwed on a roughly horseshoe-shaped plate that fit around the tongue. I didn’t expect this to work because there was no way for a significant amount of air to get past the tongue to start the oscillation cycle, and indeed it didn’t.
I also modified my bellows bench a little to allow me to block up the standard dovetail socket and screw the new oversized frame to it elsewhere, and provided a means to block the one-way valve that normally releases air when I raise the bellows so that the rig only works in the suck direction.
Next I took the horseshoe back off and started experimenting with filing away various parts of the bottom of the horseshoe vent around the tongue, to provide some space for air to get to and past the tongue and allow it to start. Eventually I got it to sound, albeit poorly, in the suck direction, and it even made a tiny bit of sound in the push direction.
I had a theory that the triangular profile resulting from filing the underside of the horseshoe vent was causing the airflow to be cut off too gradually in the blow direction, so I next made a new horseshoe piece, this time with a square-sided recess milled into the underside so there was air space all around the tongue. This was supposed to cut the flow off more cleanly when the tongue swung up into the horseshoe vent.
This did work a little better, however it was very inefficient, very quiet, and worked much better in the suck direction than the blow direction. I figured that the reason it worked unequally was because the reed tongue was profiled only on the top surface, so when it passed into the bottom vent it cut the airflow cleanly and suddenly whereas when it passed into the top vent it cut it progressively from the tip towards the root.
In order to try to solve this asymmetry, I built a second, more complicated, reed. On this one the reed tongue is set into the bottom frame by half the thickness of the reed stock, it is profiled equally on top and bottom of the tongue, and I also restricted the air pocket to the last third of the tongue, which I tried to profile fairly flat so that it cuts the airflow fairly cleanly in both directions.
The second reed was the most successful prototype I built, however it revealed the biggest flaw with the idea. When set up carefully it works pretty equally in both directions, however the amplitude is very limited compared to a standard reed:
I believe I now understand the reason for this, however it is a little tricky to explain. Before starting my experiments I had observed that with a standard reed playing at normal volume, the tongue swings well above and below the restriction point at the entrance to the vent. I imagined that with the bidirectional reed, it would swing past both restriction points and generate a similar amplitude level, perhaps with a different tone. This was based on a couple of misunderstandings about how reeds work.
My current understanding of what happens with a standard reed when it first starts up is that the tongue gets drawn down towards the frame (it needs to be set such that at rest there is a slight gap between the tongue and frame so air can start flowing). I don’t fully understand the physics behind why this happens, but it seems to me that the faster the airflow into the vent, the harder the tongue gets pulled down. The tongue descending towards the vent opening restricts the airflow into the vent, the force pulling the tongue down reduces, and the tongue springs back up, eventually peaking slightly higher than its rest position. Because it is higher, the gap between the tongue and the frame is larger and more air is able to flow through it than on the first cycle, so it gets drawn down a bit further, and springs back a bit higher than before. Over the course of a number of cycles, the amplitude builds up and up until the tongue is swinging a long way below the top of the vent. In order for this build-up to work, it’s important that every time the tongue swings a bit higher, it results in more air flowing through the vent, which causes the tongue to be pulled down harder and the amplitude of the oscillation to increase. Eventually the oscillation reaches an equilibrium level that depends on the pressure differential between the top and bottom of the reed frame. If you squeeze the bellows harder, the tongue oscillates to a greater height and the ‘packets’ of air being chopped up by the tongue passing through the frame are larger and more energetic, which results in a greater volume of sound from the instrument.
What goes wrong with my bidirectional reed that prevents it developing a decent amplitude at normal bellows pressure is that the second vent restriction, the one ‘above’ the tongue (whichever direction that happens to be), cuts off the air supply whenever the tongue tries to swing higher than the opening into the second frame. It’s impossible for the amplitude of the oscillation to ever build up any higher than the second frame, because it restricts the air supply as the tongue swings higher instead of allowing more air through. It is a lot like the governor on an engine, which throttles the fuel supply whenever it tries to exceed a certain speed.
It is possible to increase the amplitude at which the limiting occurs by increasing the distance between the two vent openings inside the reed, however there is a limit to how far you can take this. If the distance is too wide, the reed oscillations take several seconds to build up to an audible level, or never start up at all. It also becomes impossible to deliberately play the reed very quietly: you end up with a reed that has essentially no dynamic range.
To make matters worse, as well as the limited volume issue, there are several other disadvantages to this type of reed:
They seem to be less efficient (i.e. they use more air than a standard reed operating at a similarly low amplitude), possibly because the way it is constructed to allow it to perform equally in both directions has the side effect of not cutting the airflow very cleanly in either direction.
They are considerably more difficult to make than a unidirectional reed, probably something like 75% of the work of making a pair of standard reeds. A lot of the extra work has to do with making both frames a tight fit around the tongue without catching on the sides. Because nearly all of the cost of a hand-made reed like this is in labour time, it wouldn’t be a large cost saving to make an instrument with half the number of bidirectional reeds.
They are significantly bigger and heavier than a standard reed because of the need to be able to screw the two parts together; you would save a little compared to a pair of standard reeds but not as much as you might think.
There are a bunch of issues around the fact that what you would call the ‘set’ on a standard reed is fixed at manufacture-time by the relationship between the height of the recess and the thickness of the tip of the tongue. You can’t easily alter it deliberately, and it is possible to alter it accidentally as a side-effect of tuning the reed. It’s also important for the tongue to be set precisely central between the two frames, otherwise it starts poorly or not at all in one direction or the other.
I don’t know for sure, but I suspect this design would be more susceptible than a standard reed to getting dust and fluff caught inside it and impeding its operation, because the air gets forced through a narrow recess inside the reed.
It goes without saying that this type of reed is useless for an Anglo instrument because it produces the same note in both directions.
Following up on a slightly different line of inquiry, I made two final experimental reeds, one which only had a rectangular recess right at the tip, and another which was very similar but with a triangular recess instead. Neither of these worked as well as the second reed, I suspect because they only have a tiny amount of space for air to squeeze past the tongue. They sound in both directions (just about), but are very inefficient and quiet.
Here is an audio recording I made of the four experimental reeds plus a standard reed for comparison. The first reed had the second horseshoe fitted.
Although this work didn’t lead to a usable product, it was still a useful exercise for me in that I believe I now have a significantly better understanding of how concertina reeds actually work.
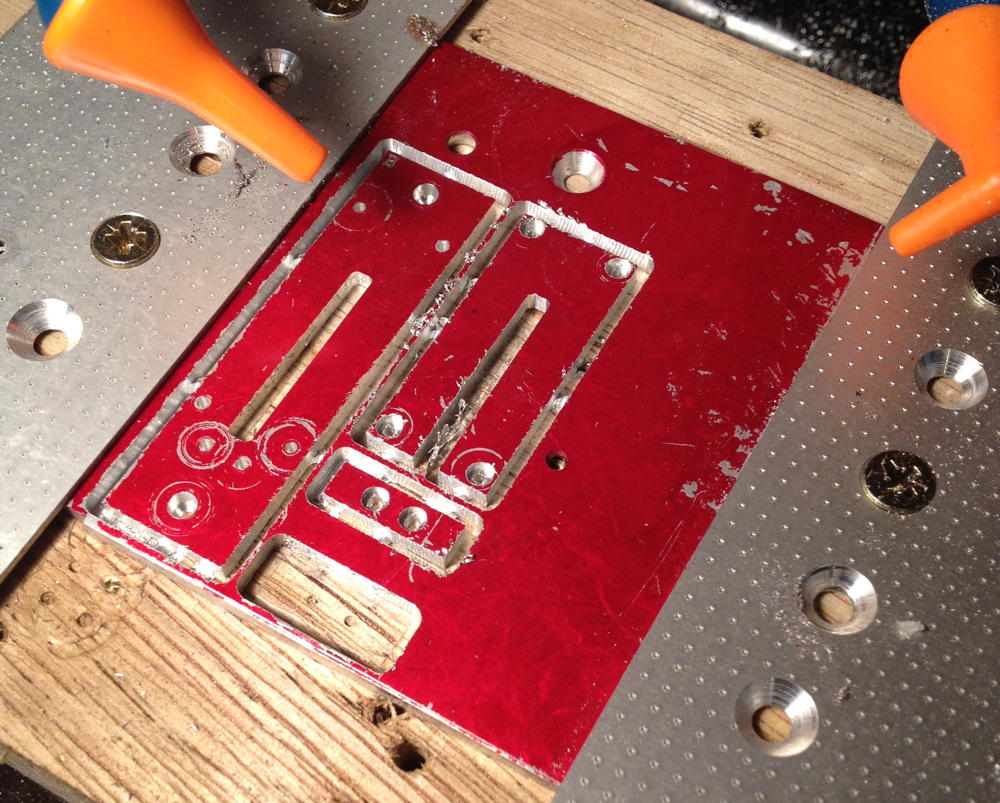
I decided I wanted to try making some punch tooling in order to manufacture a couple of the parts involved in a traditional concertina action: the felt washers that go under the buttons and the leather grommets that screw onto the ends of the action levers.
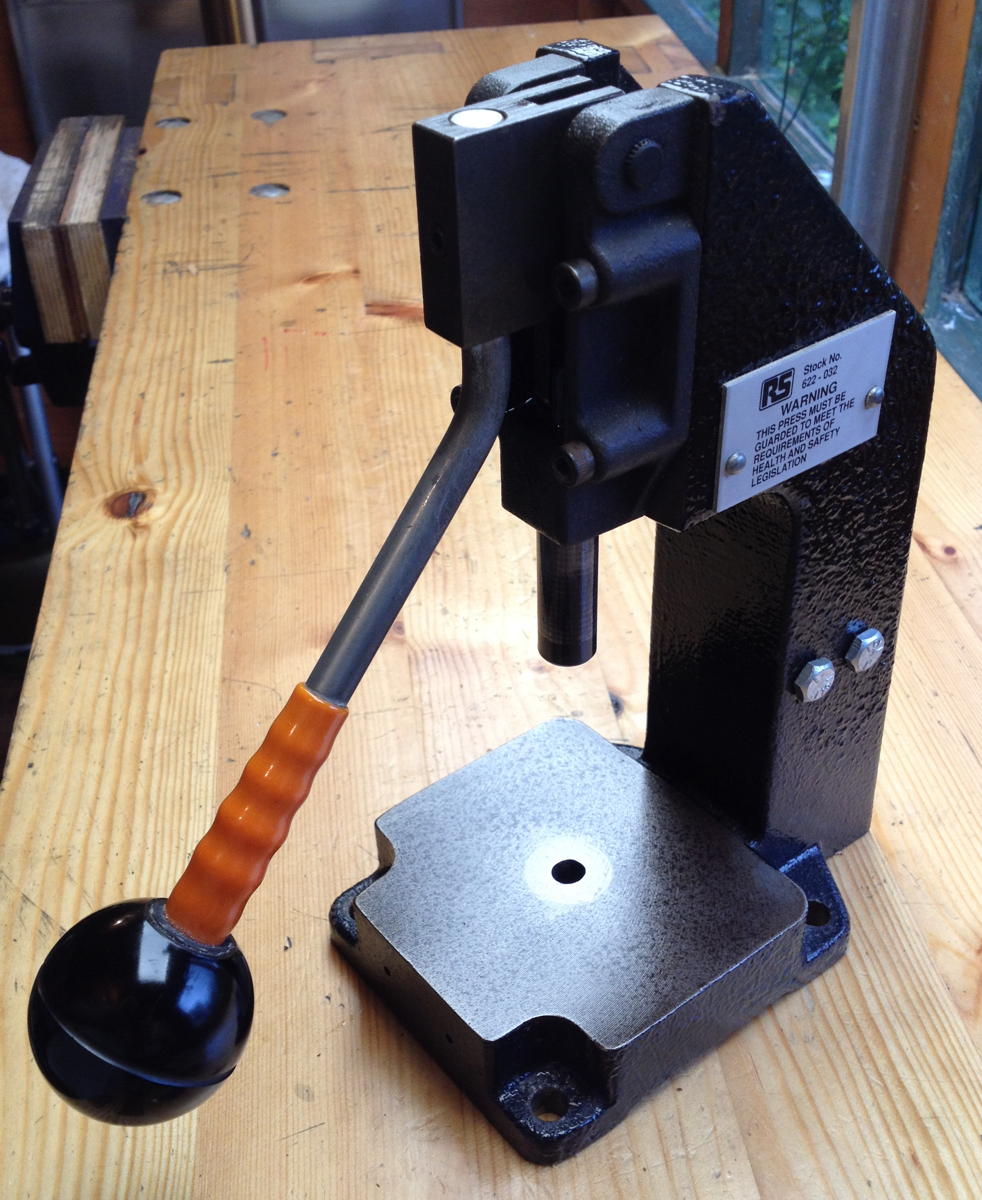
As well as the big Smart & Brown 2-ton toggle press mentioned previously, I also have a little 600N Brauer one (if my calculations are correct, the big one is rated to deliver about 30 times the force of the little one). I got it second hand some time ago, with some odd custom tooling attached to it that I never figured out what it was supposed to do. Here it is after removing the tooling and cleaning it up a little (yes, that is an old gear knob on the end of the handle – actually quite a nice addition so I left it on):
Because the throat height of the press is considerably more than the thickness of a piece of felt or leather, I turned up a 50mm tall spacer block from scrap 1″ mild steel bar. It bolts to the table of the press and has an M8 threaded hole in the top for the punch anvil, and a cross hole for the ejection of waste punched through the hole in the middle of the anvil.
I needed to cleanly bore out the inside of the felt washer punch, so I ground a simple D bit from the 1/4″ shank of a broken HSS end mill:
I drilled most of the waste out first, then used the D bit to open it out to 1/4″ and cut a flat bottom on the hole. At this stage I also drilled a 1.5mm hole for the centre pin:
I used the compound slide to turn the tapered sections of the top punches, stopping while the edge was still fairly blunt. After hardening and tempering, I put them back in the lathe and used emery paper to clean up the taper and sharpen the edge.
Threading the other end of a punch with an M8 die so it can screw into the press arbor:
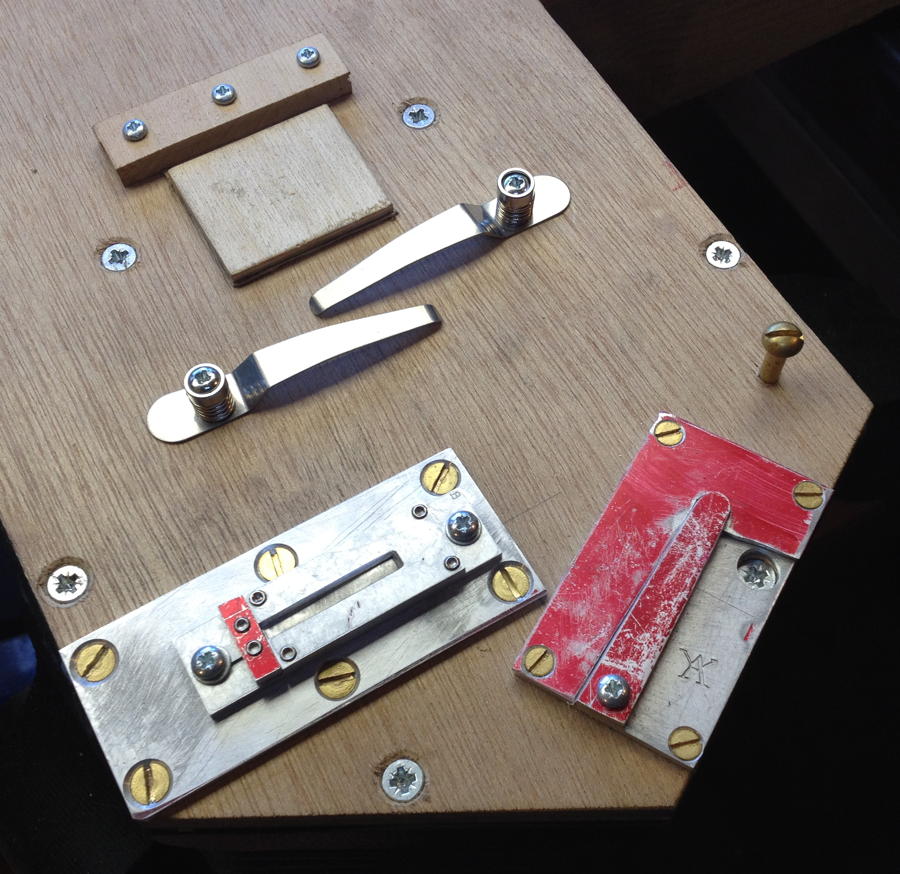
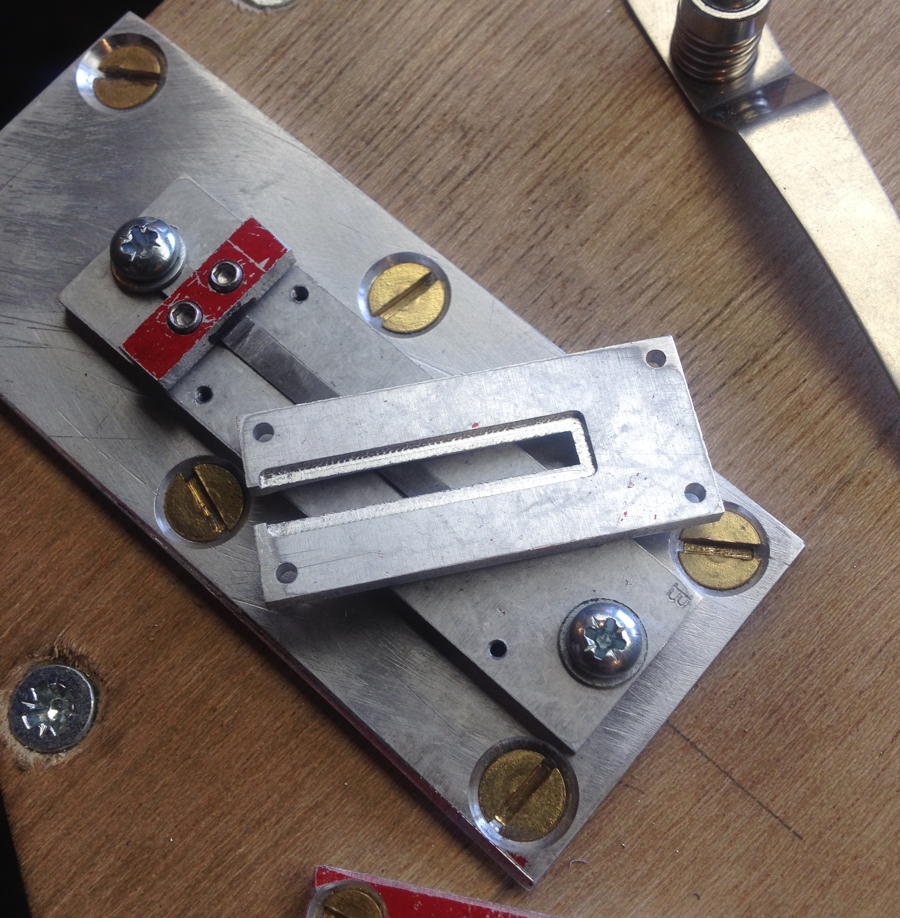
The anvil and felt washer punch installed in the press. I made the half-nuts that are used to lock the tool at the desired height by facing ordinary full nuts on an arbor.
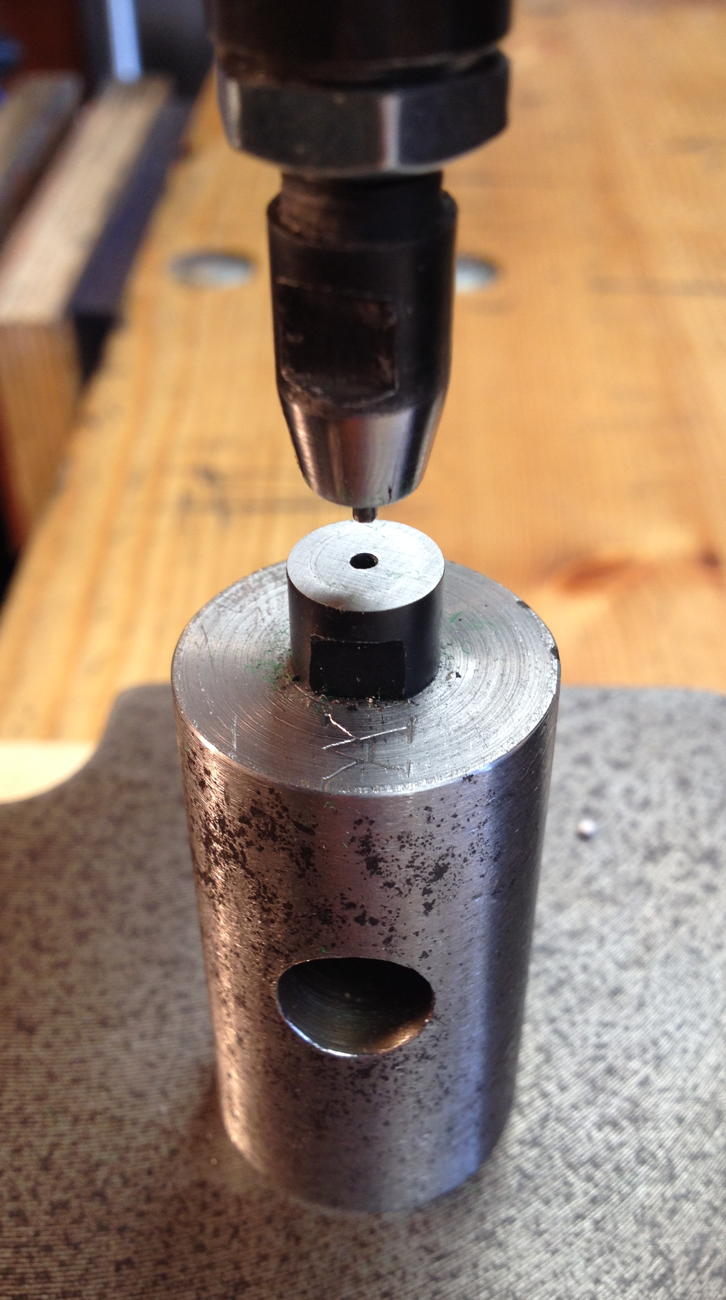
Here’s a quick video clip showing the felt washer punch in use:
This shows where the washers go on the buttons, to stop them making a clacking noise when they bottom out:
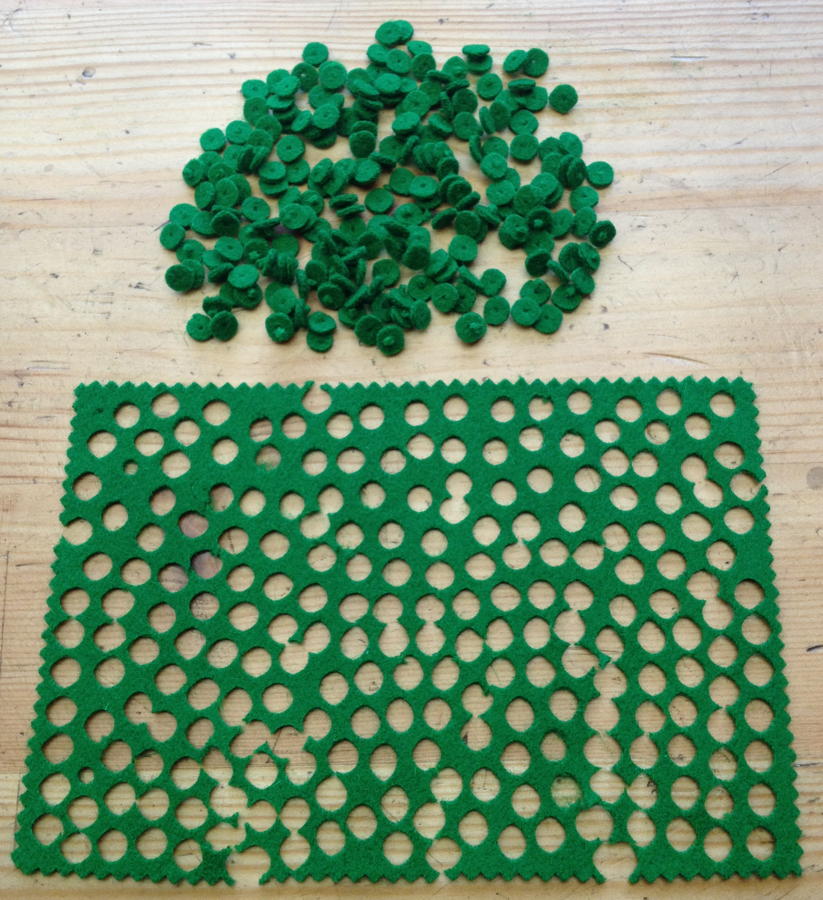
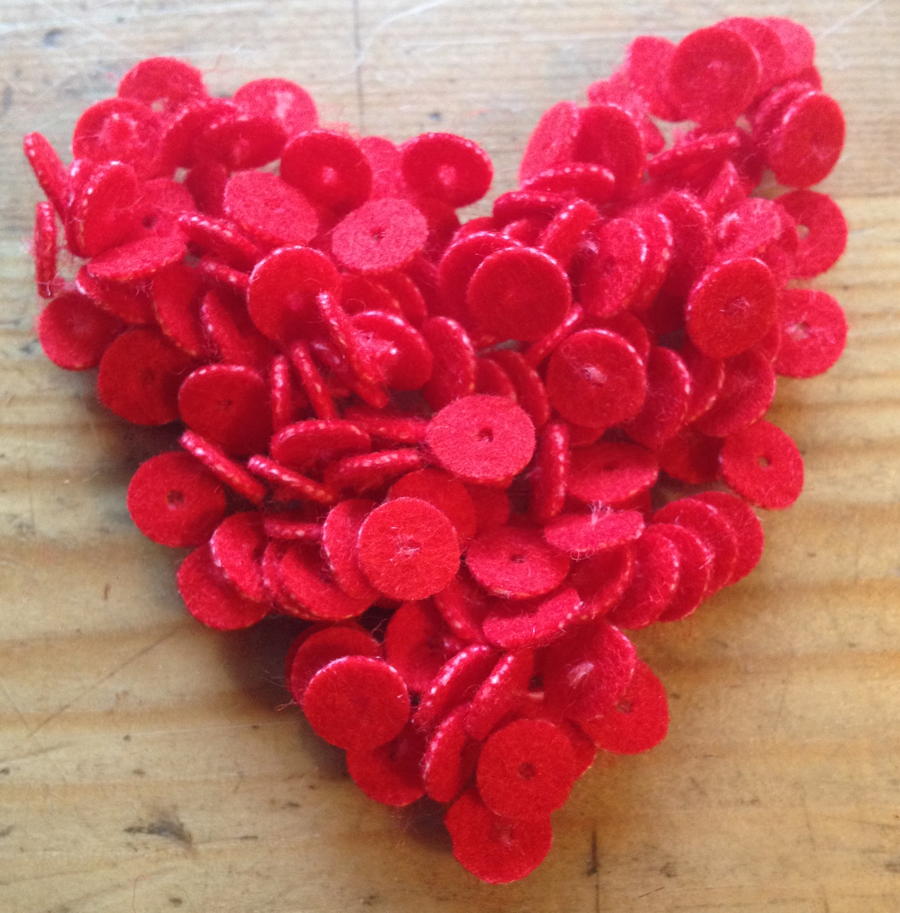
A nice stockpile of washers for my first few instruments. I made these from a sample piece of ‘baize’ woven wool cloth as used on gaming tables. I also have several other sample pieces in various different colours. I think the original washers may have been made from an actual fine, thin felt rather than a woven cloth, though – I need to get hold of some samples to experiment with.
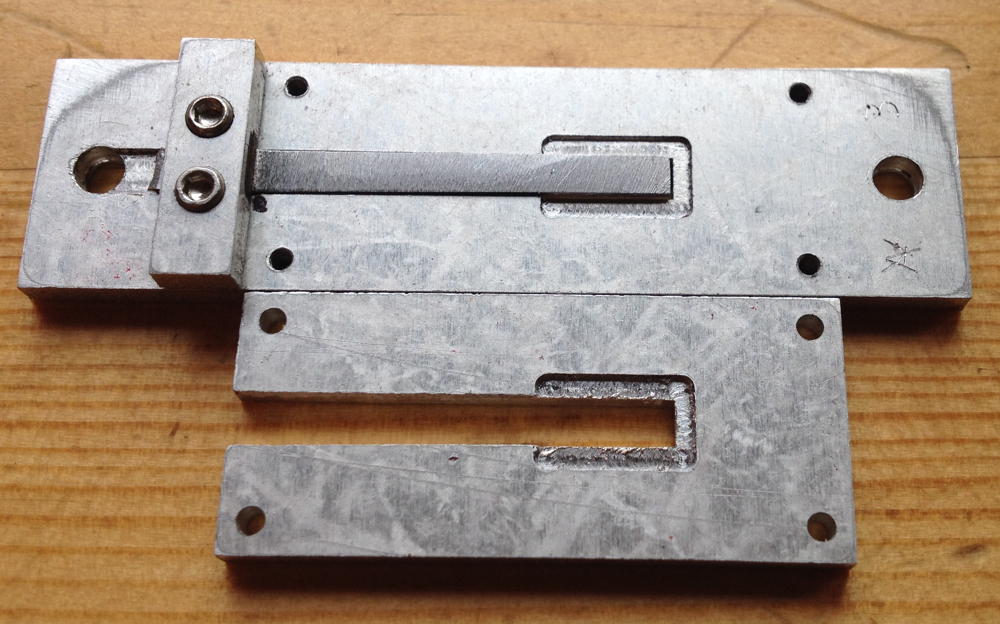
The first anvil I made had a design flaw: the hole through the middle for the ejection of waste material was drilled 1.5mm diameter all the way through the tool. In practise it quickly became constipated and I had to repeatedly remove it and drill out the waste. The one on the right is a second, improved version that is relieved to a larger diameter until a couple of mm from the top surface:
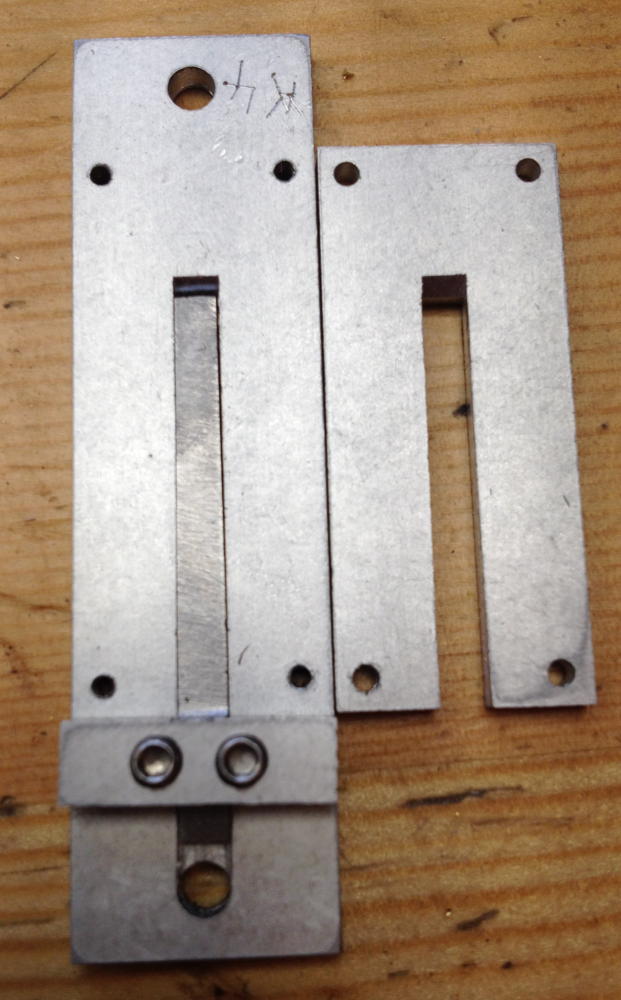
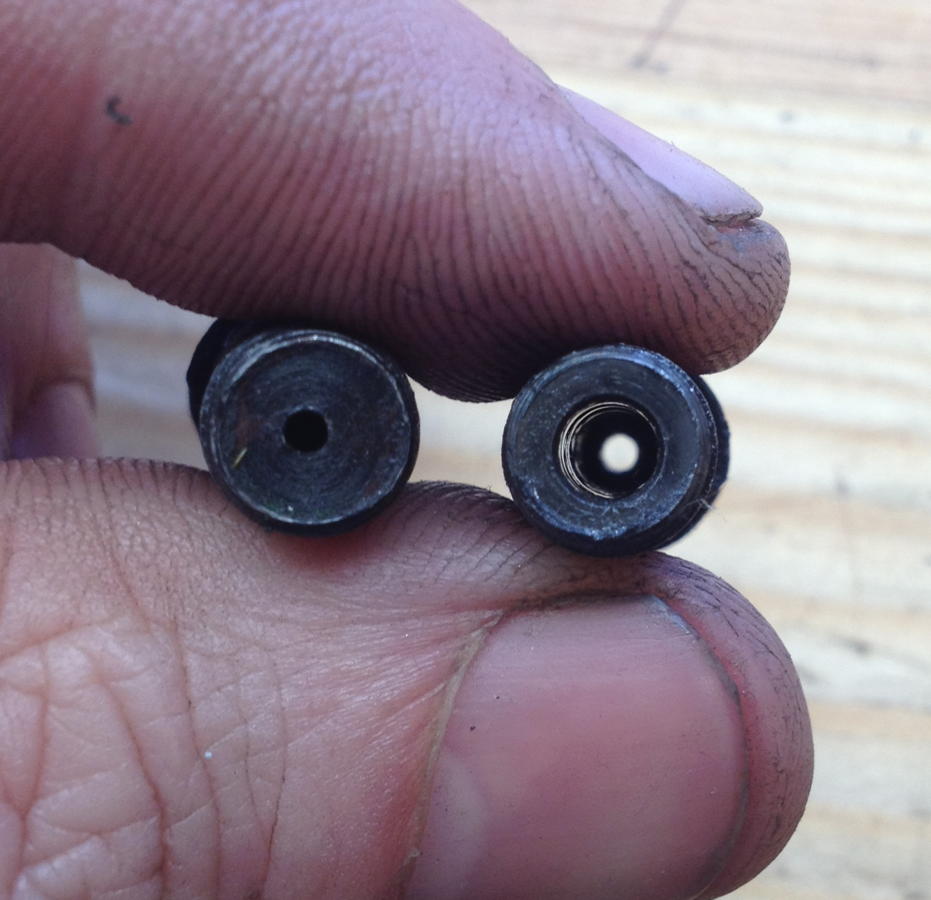
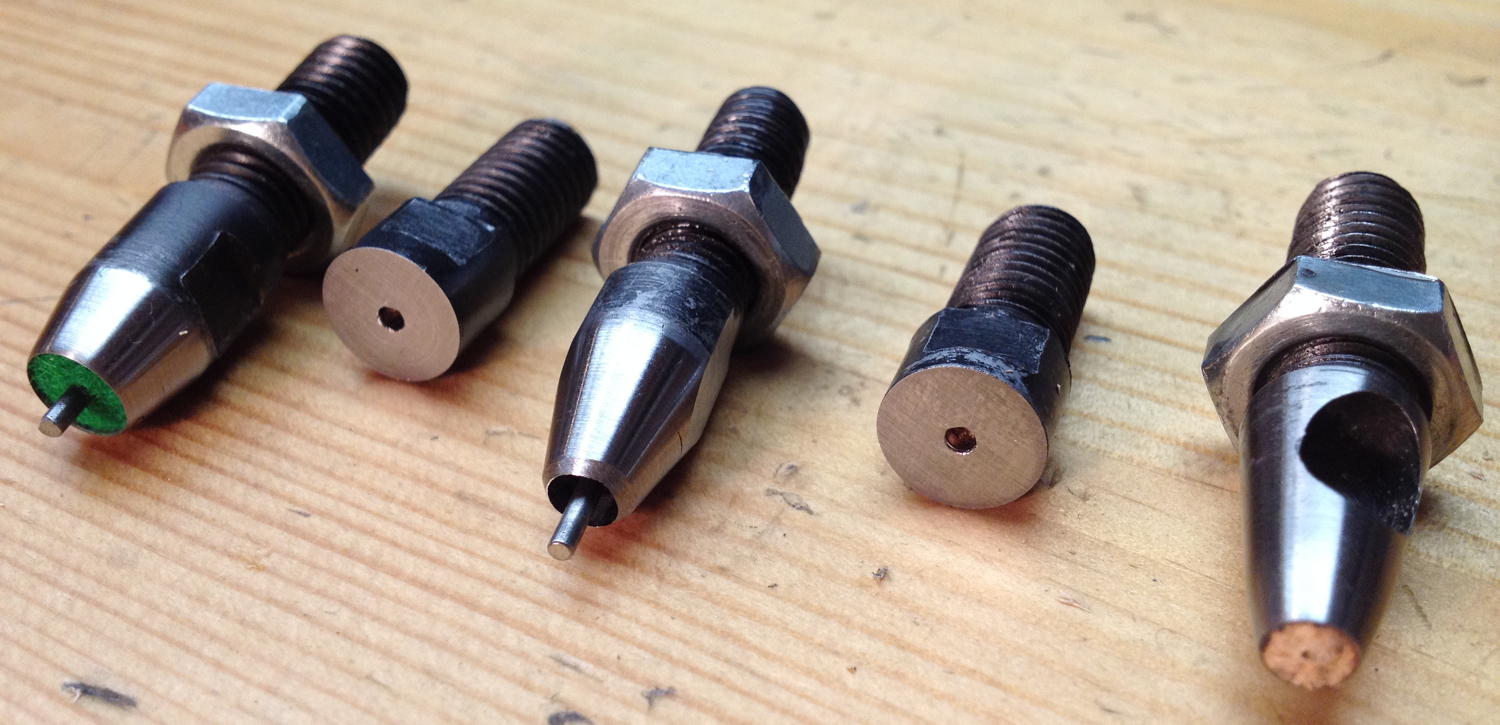
Here are all the punches and anvils I made. The first one is the felt washer punch. Inside it is a couple of layers of spongy foam and then a couple of felt washers; with careful adjustment of the pressing force this seems to be just right to prevent the washers getting stuck inside. The second one I had optimistically hoped might work the same way, but the grommets just got stuck inside it and wouldn’t come out, so I instead decided to use it to punch out the centre hole and mark the location of the outside of the grommet, then switch to the third punch which has a slot milled in the side to allow the grommets to be pushed through and removed from the top.
Here is a video clip showing the leather grommet punches in use. Note that in the video I was using 2.5mm veg tan cowskin, however I subsequently found that I got much better results from 4mm leather instead (the 2.5mm leather compressed down to 1.5mm in the punching process and the 4mm to about 3.2mm). I also removed the stripper plate seen in the video because I found it was getting in the way and causing more trouble than it was worth:
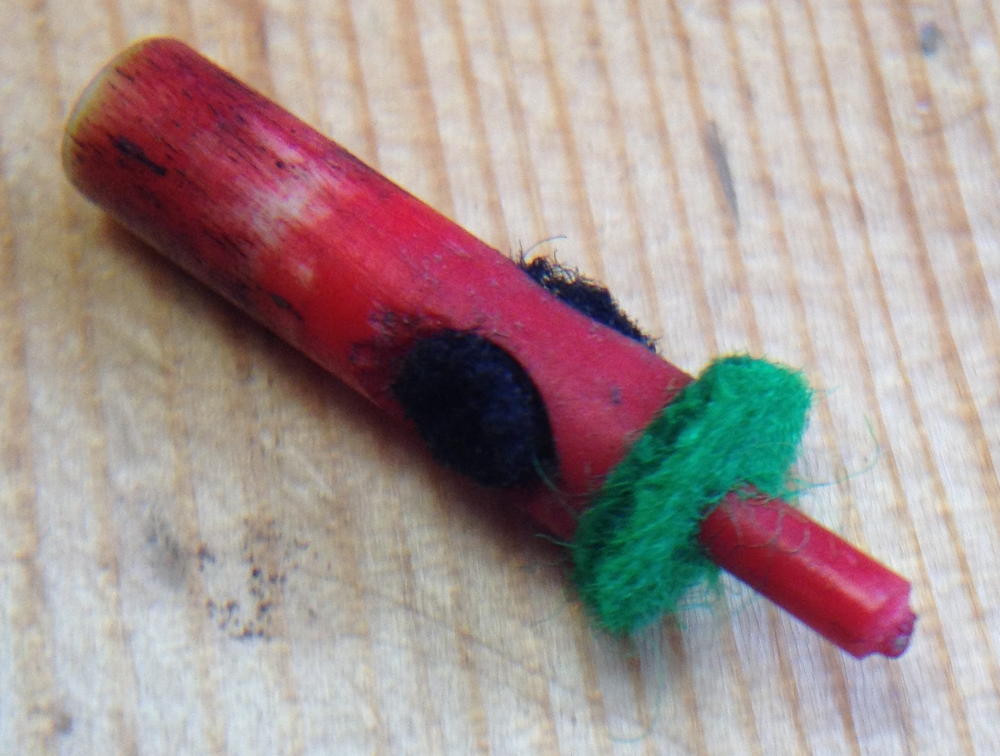
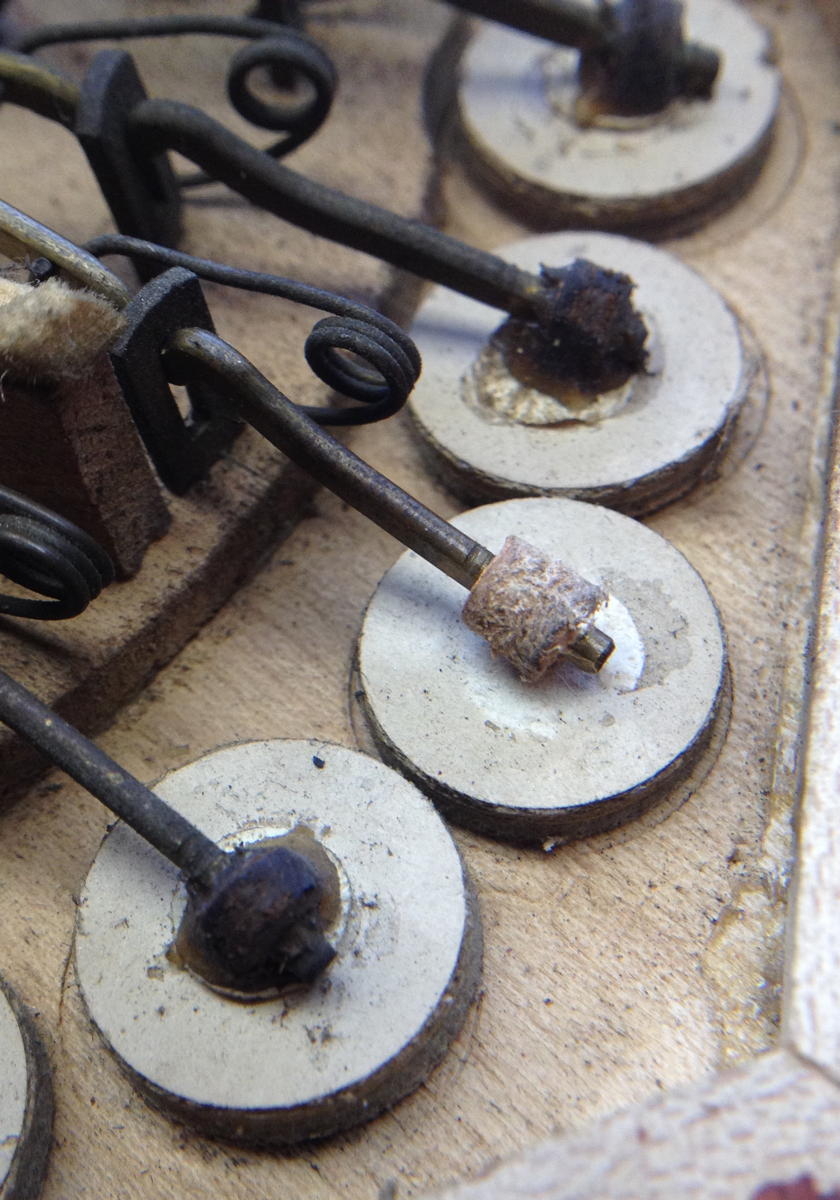
This shows where the leather grommets go inside the instrument. They screw onto the end of the lever arm (which is lightly threaded), then glue to the samper disc on top of the pad:
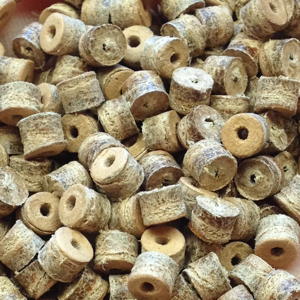
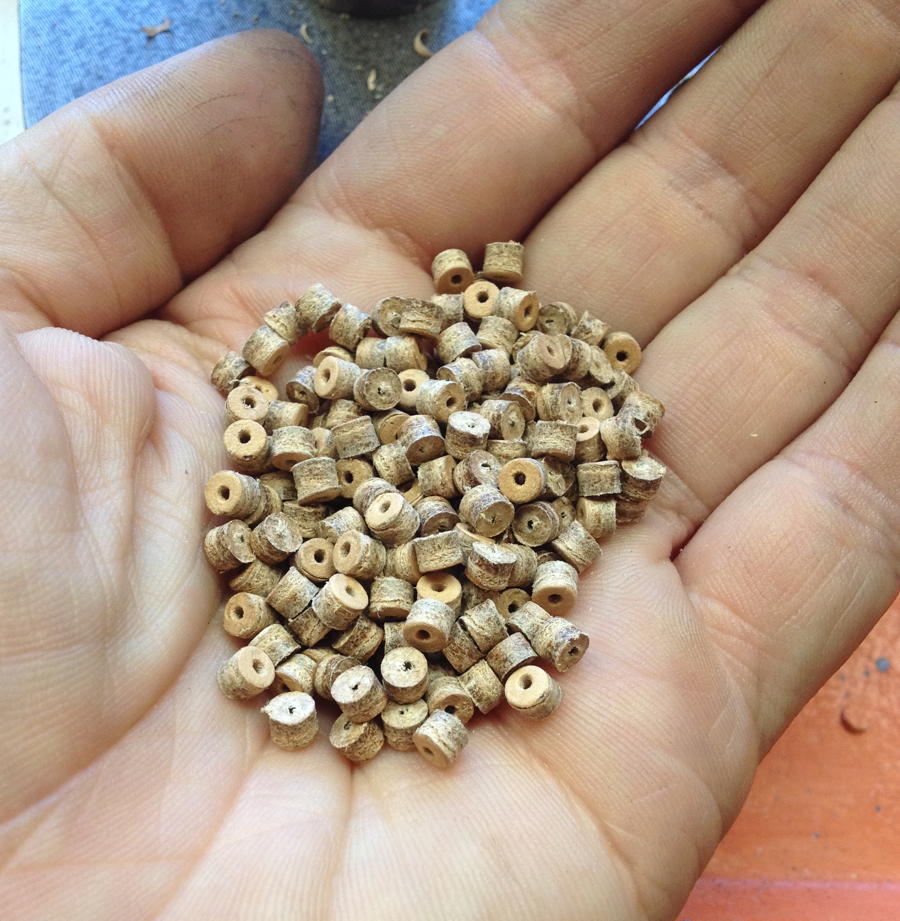
A couple of hundred leather grommets for my first few instruments:
Although these are fairly trivial parts, it certainly feels like progress to be stockpiling significant quantities of production-quality parts that I have made using my own tooling.
UPDATE: I’ve since got hold of some 0.8mm piano bushing cloth and punched more washers from it:
The piano bushing cloth is thinner, finer, and more tightly woven than the baize. Unfortunately I’ve only been able to find it in bright red with a white core. I may experiment with dyeing some of it black.
This website uses cookies to improve your experience while you navigate through the website. Out of these, the cookies that are categorized as necessary are stored on your browser as they are essential for the working of basic functionalities of the website. We also use third-party cookies that help us analyze and understand how you use this website. These cookies will be stored in your browser only with your consent. You also have the option to opt-out of these cookies. But opting out of some of these cookies may affect your browsing experience.
Necessary cookies are absolutely essential for the website to function properly. This category only includes cookies that ensures basic functionalities and security features of the website. These cookies do not store any personal information.
Any cookies that may not be particularly necessary for the website to function and is used specifically to collect user personal data via analytics, ads, other embedded contents are termed as non-necessary cookies. It is mandatory to procure user consent prior to running these cookies on your website.